(**) Translated with www.DeepL.com/Translator
[ LEVEL ] Beginner
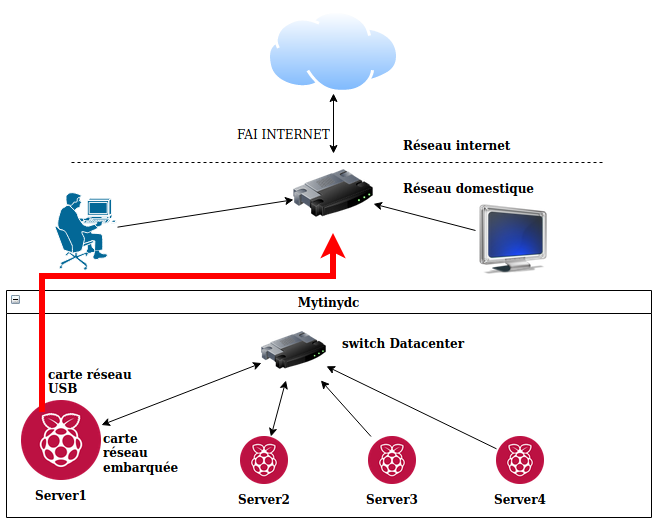
This procedure allows the initialization of your Datacenter (Mytindydc) IPV4, IPV6 not supported. The initialization consists in using a unit that will be the “bridge” (network) between your home network (home network connected to the internet) and all the machines integrated in the Datacenter.
[ MYTINYDC-IM INTEGRATION ] in progress… ( see Datacenter manager )
Prerequisite
To carry out this operation you must :
- have an operational home network (internet box), connected to the internet, with the DHCP service activated.
- have a Raspberry Pi or Rock64 unit equipped with an SD card on which the Debian operating system is installed (see chapter installing the DEBIAN system on the Datacenter servers).
- have a switch for the machines in the datacenter. Prefer a Gigabit switch for evolution (8 ports - less than 30€)
- a second network card (USB - about 10€) which will be connected to the above mentioned unit
- connect a display and keyboard to the unit
- know how to execute a command in a Linux console
- know how to use the “vi” editor
- be connected “root” to the console, for sudo users: type
sudo bash - determine the domain name of your datacenter
Isolate the datacenter
To isolate the Datacenter, your first server will need two network interfaces. One connected to the Datacenter switch, the other connected to your home network to connect to the Internet.
The second network card (USB) allows isolation. Do not hesitate to use a “Gigabit” (1000Mbps) network card, even if your unit does not support “g
Gigabit”. The network card will adapt to the context and you will be able to upgrade the capacities of your Datacenter over time, for a price similar to the base price.
| Unit type | Gigabit support (1000Mbps) |
|---|---|
| Raspberry PI up to version 3 | no |
| Raspberry PI4 | yes |
| Rock64 | yes |
Datacenter Network Setup
Connected to your unit’s console, list the available network interfaces by typing the command :
ip list

# Response
1: lo: <LOOPBACK,UP,LOWER_UP> mtu 65536 qdisc noqueue state UNKNOWN mode DEFAULT group default qlen 1000
    link/loopback 00:00:00:00:00:00 brd 00:00:00:00:00:00
2: eth0: <BROADCAST,MULTICAST,UP,LOWER_UP> mtu 1500 qdisc pfifo_fast state UP mode DEFAULT group default qlen 1000
    link/ether xx:xx:xx:xx:xx:xx brd ff:ff:ff:ff:ff:ff
The “lo” interface is a virtual network interface booted by default on all Linux systems with an IP network system (See the article wikipedia).
The embedded network card of the unit (here eth0, it can also be enp0s3, etc…) does not have an IP address (check with the command: “ip address”).
This interface is connected to the Datacenter network, which does not have a network at initialization.
This documentation does not cover IP networks (Internet Protocol), you will find a very rich documentation on the Internet on this subject.
To initialize the Datacenter network, we will use a private network (wikipedia article), for this documentation, it will be the 172.21.0.0/24 network, which will allow to manage 254 units, large enough for our use case. I assign the first address of this network to this unit. Modify the file /etc/network/interfaces.
vi /etc/network/interfaces

# Add
auto eth0
allow-hotplug eth0
iface eth0 inet static
address 172.21.0.1
netmask 255.255.255.0

# where eth0 is the name of the network interface detected by the command executed above.
# Save : ESC : wq

# restart network service
systemctl restart networking

# check
ip address

# Response :
: lo: <LOOPBACK,UP,LOWER_UP> mtu 65536 qdisc noqueue state UNKNOWN group default qlen 1000
    link/loopback 00:00:00:00:00:00 brd 00:00:00:00:00:00
    inet 127.0.0.1/8 scope host lo
       valid_lft forever preferred_lft forever
2: eth0: <BROADCAST,MULTICAST,UP,LOWER_UP> mtu 1500 qdisc pfifo_fast state UP group default qlen 1000
    link/ether xx:xx:xx:xx:xx:xx brd ff:ff:ff:ff:ff:ff
    inet 172.21.0.1/24 brd 172.21.0.255 scope global eth0
       valid_lft forever preferred_lft forever
(*) For more details about setting up network cards in Debian, see this article
Installing a second network card
Without plugging in the USB network card, type the command :
ip list

# Response
1: lo: <LOOPBACK,UP,LOWER_UP> mtu 65536 qdisc noqueue state UNKNOWN mode DEFAULT group default qlen 1000
    link/loopback 00:00:00:00:00:00 brd 00:00:00:00:00:00
2: eth0: <BROADCAST,MULTICAST,UP,LOWER_UP> mtu 1500 qdisc pfifo_fast state UP mode DEFAULT group default qlen 1000
    link/ether xx:xx:xx:xx:xx:xx brd ff:ff:ff:ff:ff:ff
Plug the USB card into one of the USB ports on the device, type the command :
ip list

# Response
1: lo: <LOOPBACK,UP,LOWER_UP> mtu 65536 qdisc noqueue state UNKNOWN mode DEFAULT group default qlen 1000
    link/loopback 00:00:00:00:00:00 brd 00:00:00:00:00:00
2: eth0: <BROADCAST,MULTICAST,UP,LOWER_UP> mtu 1500 qdisc pfifo_fast state UP mode DEFAULT group default qlen 1000
    link/ether xx:xx:xx:xx:xx:xx brd ff:ff:ff:ff:ff:ff
3: eth1: <BROADCAST,MULTICAST,UP,LOWER_UP> mtu 1500 qdisc pfifo_fast state UP mode DEFAULT group default qlen 1000
    link/ether xx:xx:xx:xx:xx:xx brd ff:ff:ff:ff:ff:ff
Locate, by display difference, the new USB network card: “eth1”, “enp0s8”, etc… In this case the new card is named “eth1”.
Edit the file /etc/network/interfaces and add :
auto eth1
allow-hotplug eth1
iface eth1 inet dhcp
(*) Replace eth1 with the name of the interface discovered above. Disconnect and then reconnect the USB network card, type the command :
ip address

# Response
1: lo: <LOOPBACK,UP,LOWER_UP> mtu 65536 qdisc noqueue state UNKNOWN group default qlen 1000
    link/loopback 00:00:00:00:00:00 brd 00:00:00:00:00:00
    inet 127.0.0.1/8 scope host lo
       valid_lft forever preferred_lft forever
2: eth0: <BROADCAST,MULTICAST,UP,LOWER_UP> mtu 1500 qdisc pfifo_fast state UP group default qlen 1000
    link/ether xx:xx:xx:xx:xx:xx brd ff:ff:ff:ff:ff:ff
    inet 172.21.0.1/24 brd 172.21.0.255 scope global eth0
       valid_lft forever preferred_lft forever
3: eth1: <BROADCAST,MULTICAST,UP,LOWER_UP> mtu 1500 qdisc pfifo_fast state UP group default qlen 1000
    link/ether xx:xx:xx:xx:xx:xx brd ff:ff:ff:ff:ff:ff
    inet 192.168.1.15/24 brd 192.168.1.255 scope global eth1
       valid_lft forever preferred_lft forever
Check that the new network interface has an IP address (here 192.168.1.15, this address depends on the configuration of the DHCP service of your Internet Box). If you do not have an IP address, check the DHCP configuration part of your home network (Box internet), this service must be activated on your Box. Repeat the previous operation.
Internet access
The unit is connected to the Datacenter switch through its on-board network interface, and connected to the home network through the USB network interface.
Check the unit’s internet access by typing the command :
ping opendns.com

# Response :
PING opendns.com (146.112.62.105) 56(84) bytes of data.
64 bytes from opendns.com (146.112.62.105): icmp_seq=1 ttl=53 time=95.5 ms
64 bytes from opendns.com (146.112.62.105): icmp_seq=2 ttl=53 time=95.0 ms
[...]

# CTRL+C to stop the ping process
Domain name of your Datacenter
You will determine the domain name at your Datacenter. This name is the equivalent of what you already know from surfing the internet. Example with www.mytiydc.com, the domain name is “mytinydc.com”, “www” is the name of the server that has the service to be consulted, in this case a web service that distributes html pages. “www” is part of the domain “mytinydc.com”, the full name of the machine (or service) is “www.mytinydc.com”. This name is associated with an IP address.
The name of this domain must not be an Internet domain. Internet domains are managed by official and limited “registrars” (.com, .fr, .eu, etc…).
The domain name of our Datacenter will be the name of the group in which all the machines of the Datacenter are attached. Each server in the datacenter must be able to “find” its counterparts by name.
If you specify a domain name from the Internet network, the DNS (system of IP address/name resolution) will look for the answer on the “Internet” network, which is not expected in our case.
In this documentation, the assigned domain name will be “mondc” for the abbreviation of “mydatacenter” (in french : mondatacenter), which is easier to type.
The servers of the Datacenter will be part of the domain “mondc” and can be reached by the combination [server name] . [domain name] (ex: server1.mondc, server2.mondc,…).