(**) Translated with www.DeepL.com/Translator
End of use, I replaced the DNS/DHCP service (Bind9/isc-dhcp-server) with Technitium DNS which also implements the DHCP service and dynamic DNS updates.
[ LEVEL ] Beginner
This procedure allows the installation of the Bind9 service, which is the implementation of a DNS (Domain Name System) service.
[ MYTINYDC-IM INTEGRATION ] in progress… ( see Datacenter Manager )
Prerequisite
To carry out this operation you must :
- have followed the Datacenter Initialization procedure.
- know how to execute a command in a Linux console
- know how to use the “vi” editor
- be connected “root” to the console, for sudo users: type
sudo bash.
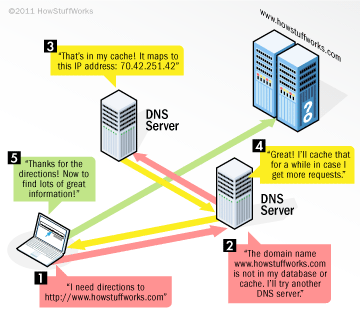
What’s a DNS (Domain Name System) for? Explanations in a picture
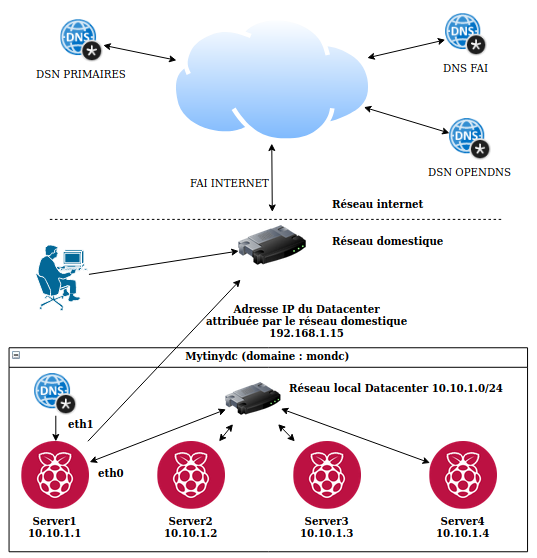
The Mytinydc implementation
The Datacenter has its own communication network. Each server integrated in the data center is part of the Internet domain assigned to the data center and queries the data center’s DNS service. Please understand that the servers do not directly query the DNS servers on the Internet.
If you want to use the DNS service of your Datacenter from your home network, you will need to set up your home network (Internet Box).
This is usually done by configuring the DHCP service of your Internet Box. In the “DNS server address” field, enter the “external” address of the Datacenter (network interface exposed on your home network). The machines in your home network will then use the Datacenter’s DNS service and will be able to join the Datacenter’s services (nextcloud, matrix,…).
Installing the necessary packages
Execute the command :
apt-get -y install dnsutils bind9
Opening Communication Ports (Firewall)
In order to offer this service, the server will have to respond to the various requests from the client machines and also request resolution from other DNS servers in the event that the requested domain is not managed by the latter. This table is provided as an indication, as your unit does not have an active firewall system at the moment :
| Protocol | Port | Direction | Network Interfaces |
|---|---|---|---|
| UDP | 53 | Input | Interface(s) connected to callers |
| TCP | 53 | Input | Interface(s) connected to callers |
| UDP | 53 | Output | Interface(s) connected to Internet networks |
| TCP | 53 | Output | Interface(s) connected to Internet networks |
| TCP | 953 | Input | lo |
Interactions between the DHCP service and the DNS service.
The DNS service is autonomous and contains the description of the associations :
- server or service name / IP address (forward)
- and vice versa, IP address / server or service name (reverse)
- name alias (cname), which is a reference to an already existing name.
This service is managed through files, which the administrator completes manually by describing the associations.
A mechanism allows, in part, automated management based on information received from the DHCP service.
DHCP (Dynamic Host Configuration Protocol)
This service is responsible for distributing IP addresses over a computer network. Its function is to describe the machines connected to the network, and the general information of the network (inter-network gateways, DNS addresses of the BOOTP servers, …).
Once the IP address is distributed to the connected machine, the DHCP service connects to the DNS service, after authentication, the DHCP service sends the host name and the distributed IP address to the DNS service which updates the “name/IP address” association files and/or the reverse according to the administrator’s choices.
Authentication to the DNS service
To allow communication between these two services (DNS and DHCP), we will generate an authentication key on the DNS server by performing these operations:
# Connected as "root" to the future DNS server.
# Install the necessary packages (see above).
# Create the authentication key:
rndc-confgen -a
#The file "/etc/bind/rndc.key" has been created
Change the file permissions with the :
chown root:bind /etc/bind/rndc.key
chmod 640 /etc/bind/rndc.key
Standardization
Usually, DHCP and DNS services are located on a single server, so you don’t see the need for the authentication mechanism. This will become necessary if you want to move one of these services to another server. By standardizing the authentication upon installation, moving one of these services to another machine will be a simple formality.
Creating the domain
In this documentation, the domain to manage is named “mondc “, the network used is : 172.21.0.0/24, the administrator’s email address is “root@mondc “, the DNS server name is raspi1.
The DNS manages “forward” and “reverse” zones. The “forward “ zones allow the resolution : Domain name to IP address. The “reverse “ zones allow the resolution : IP address to Domain name. You can have multiple names for a single IP address (forward), but only one name for an IP address (reverse).
**All the following configurations will have to be adapted to your infrastructure.
The zone file
Zone files are the databases containing the associations for each of the zones managed by the DNS. These zones are described in the file "/etc/bind/named.conf.local “.
//
// Do any local configuration here
//

include "/etc/bind/rndc.key";

zone "mondc" {
        type master;
        allow-update { key rndc-key;};
        allow-query {any;};
        file "/var/cache/bind/db.mondc";
        };

zone "0.21.172.in-addr.arpa"{
        type master;
        allow-update { key rndc-key;};
        allow-query {any;};
        file "/var/cache/bind/db.172.21.0.0";
};
In this case, the DNS service configuration describes two zones :
- “mydc”
- “0.21.172.in-addr.arpa”
A field can be of type “forward “ or “reverse “.
Explanations about the zone file
The zone file consists of several blocks that describe the :
- The block begins with the keyword “zone “ followed by the name of the zone. For inverted zones (in-addr.arpa), the address of the managed network is inverted, always without the variable digits of the network (subnetwork), and always followed by the keyword “.in-addr.arpa”.
- type defines the type of DNS, its value can be “master” or “slave”. For now, we will discuss that the “master”, “slave” case is used in the context of a replication.
- allow-update is an option, it is the key used to allow automatic updates by third party services, in this case DHCP service.
- allow-query defines which hosts are allowed to query your DNS server. By default, bind allows everyone. I include this line for comprehension reasons although it is not necessary in my case. Its value can be an IP address (192.168.1.20), a network (192.168.1.0/24), or everyone represented by “any”. It is possible to manage “access-lists”, not discussed here (keyword acl).
- file indicates the file name of the database file of managed hosts. By default and on DEBIAN distributions, these files are located in the "/var/cache/bind/” directory.
Watch out for this syntax.
The hosts file of a forward zone type
The filename will be “/var/cache/bind/db.mondc”, as specified in the field description file “/etc/bind/named.conf.local” :
$ORIGIN .
$TTL 3600       ; 1 hour
mondc  IN   SOA   raspi1. root.mondc. (
                    1505024492
                    10800
                    3600
                    604800
                    38400
                    )
        NS          raspi1.mondc.
        MX          0 raspi1.mondc.
$ORIGIN mondc.
$TTL 3600       ; 1 hour
raspi1                  A       172.21.0.1
The hosts file of a reverse zone type
The file name will be “/var/cache/bind/db.172.21.0.0”. as specified in the zone description file “/etc/bind/named.conf.local” :
$ORIGIN .
$TTL 3600       ; 1 hour
0.21.172.in-addr.arpa   IN      SOA    raspi1. root.mondc. (
                                        1505024492 ;serial
                                        10800 ;refresh
                                        3600 ;retry
                                        604800;expire
                                        38400;minimum
                                        )
                        NS      raspi1.mondc.
$ORIGIN 0.21.172.in-addr.arpa.
$TTL 3600       ; 1 hour
1	PTR   	raspi1.mondc.
Explanations about host files
This documentation (French language) clearly and simply explains a DNS configuration. This person’s website does not have an email address, so I could not contact her to ask her permission to quote it. In the event of a dispute, I undertake to remove his quotations from this document.
Description of the area :
-
the @ barely visible at the beginning of the record is a simplified way to define the zone, here “mondc”.
This definition is consistent with the description contained in the zone description file “/etc/bind/named.conf.local”. -
then the TTL. As it is no different from the one defined in $TTL, there is no need to specify a value of
-
then the class, IN appears. In the rest of the file, we can perfectly, in the following file, dispense with specifying it
-
then the type of information. On a master server, there must be one and only one SOA (Start of Authority) record, and it is always the first host record in the zone file.
-
Finally, the data. In the present case, they are particularly provided since we find :
- raspi1., the fully qualified name of the name server (FQDN). One will not fail to note the . so discrete to the right of the “fr” and characteristic of these absolute names. It allows “bind” to go up to the top of the name tree. This field is also named “hostmaster” (source) :
-
root.mondc. is the particular way “bind” takes into account the server administrator’s email address, with a . instead of @, the end dot is important.
-
then, between (), a number of parameters followed by comments introduced by a ;, namely :
- first a serial number which must be incremented each time the file is modified. This number allows the slave servers to be informed of modification operations on the host files. It is customary to choose a number of the type “yyyymmdd”, followed by a serial number, but this is by no means obligatory, the important thing being that these numbers are always incrementing.
- “refresh”, “retry”, and “expire” are delays, expressed in seconds, which will control the behavior of the slave servers. When the refresh timeout expires, the slave will contact the master; if it cannot find the master, it will try again at the end of the retry timeout. And if, at the end of the retry delay, it has not succeeded, it will consider that the master server has been removed from service.
- “minimum” determines, always in seconds, the minimum cache lifetime. Note the arrangement of the brackets, mandatory to arrange the information on several lines.
NS and MX recordings
The field configuration is followed by the NS and MX records. These records must mention the name of the domain to which they belong (e.g. raspi1.mondc.).
NS describes the DNS server of the zone, you can have several records of this type
MX describes the email server of the zone, you can have several records of this type. MX is always followed by a number that represents its priority over other MX records in the zone (e.g. MX 10 raspi1.mondc.).
@ORIGIN indicates the domain name to be added to all records following this line. This allows the administrator to limit the entry of records. Example: :
@ORIGIN mondc.
raspi1                  A       172.21.0.1
The full domain name of this record will be “raspi1.mondc.”.
The “host” records
Each “host” type record normally contains five fields, separated by a space; we will see why there are some exceptions. These five fields are :
- first, the domain name.
- second, the validity period of the record called TTL (Time To Live).
- the class, i.e. the protocol used; today, only IN remains for the Internet
- and then the type of information contained in the record.
- and finally the data itself; depending on the type of data, this field will contain different types of information.
Domain name alias
This type of record is defined by the keyword “CNAME” and allows you to create a domain name alias without having to repeat the IP address. This record type is only used in “forward” type fields. Apache and nginx servers can host several websites with a different domain name (Virtual hosts). Thus several domain names will have the same IP address. The use of aliases makes DNS management easier, an example: you have a shared server, for whatever reason, this server must change its IP address, instead of modifying each of the impacted domain names, you will only have to change one line.
#Example :
monsiteweb1	A 172.21.0.20
monsiteweb2 CNAME monsiteweb1
monsiteweb3 CNAME monsiteweb1
[..]
Add-on file “/etc/bind/rndc.conf”
The “Bind9” package comes with a utility called “rndc”, which allows you to use command lines to administer the DNS service.
In order to prevent unauthorized access to the “named” daemon, “bind” uses a shared secret key authentication method to grant privileges to hosts. Thus, an identical key must be present in both “/etc/bind/named.conf” and the rndc configuration file, i.e. “/etc/bind/rndc.conf” (source).
This service is installed and configured by default on DEBIAN during the installation of the “Bind9” package, so you don’t have to set anything.
If you want to reconfigure the service, please go to see here.
Example file /etc/bind/rndc.conf :
# Start of rndc.conf
key "rndc-key" {
        algorithm hmac-md5;
        secret "clé secrete";
};

options {
        default-key "bind.keys";
        default-server 127.0.0.1;
        default-port 953;
};
# End of rndc.conf
Resolution of other areas
Bind9 can resolve domains it does not manage to other DNS servers. These can be the primary DNS of the Internet or the DNS of your choice.
By querying the primary DNS
In its original configuration, Bind9 for DEBIAN includes the international DNS lookup, so the “Forward” function is not activated. The DNS server takes care of resolving the names that are not part of the domains it manages itself to the primary DNS of the Internet. To find this list, consult the file mentioned in the “.” zone of the configuration file "/etc/bind/named.conf.default-zones “.
By querying another DNS
This can be your Internet Service Provider’s, or the one provided by OPENDNS, etc…
The configuration of this type is called “forwarders” and is configured through the file /etc/bind/named.conf.options. To enable this type of configuration, uncomment the :
// forwarders {
// 0.0.0.0;
// };
as follows, and indicate the DNS address(es) of your choice, for example with OPENDNS :
options {
[...]
forwarders [
   //primary server
   208.67.222.222;
   //secondary server
   208.67.220.220;
};
// add this rule
forward only;
[...]
}
Then restart the service:
systemctl restart Bind9
Activation dnssec
The dnssec protocol is used to ensure the response to a DNS query (See this article provided by Wikipedia).
To enable dnssec, modify the file /etc/bind/named.conf.options as follows :
options {
        directory "/var/cache/bind";

[...]
        dnssec-enable yes;
        dnssec-validation yes;
[...]
};
Then restart the service:
systemctl restart Bind9
IPV6 deactivation
My Datacenter does not use IPV6, I disabled this feature to avoid errors in the logs (/var/log/syslog).
Still in the file /etc/bind/named.conf.options, comment the line: “listen-on-v6 { any; };” as follows :
options {
        directory "/var/cache/bind";
...
        //listen-on-v6 { any; };
};
Then restart the service:
systemctl restart Bind9
Modification du paramétrage de résolution
Une fois le service DNS installé et démarré, modifiez le fichier /etc/resolv.conf comme suit et en adaptant le contenu à votre configuration :
domain [votre domaine]
nameserver [Adresse IP de votre serveur DNS]
La ligne commençant par domain indique que votre machine appartient au domaine spécifié, chaque tentative de résolution d’un nom, sans suffixe de domaine, obligera le client DNS à rechercher dans la zone définie par domain. Exemple : avec domain défini avec “mondc”, tentez de resoudre “raspi.mondc” ou “raspi” est équivalent. Ceci évite de devoir tapez le domaine quand vous êtes situé dans le domaine.
La ligne nameserver, il peut y en avoir plusieurs indique, dans l’ordre de priorité, les adresses IP des DNS chargés de répondre aux différentes requêtes de résolutions de noms par cette machine.
Important : Empêcher l’altération de ce fichier par le service DHCP client :
chattr +i /etc/resolv.conf
Avant de modifier à nouveau ce fichier exécutez la commande :
chattr -i /etc/resolv.conf
Important notes
My Mytinydc’s DNS service configuration files only define the DNS server for the zone. All the units in my Datacenter are set up to get an IP address on the network. The DNS service update is automated through the DHCP service / DNS service interaction (see chapter DHCP service).
Running test
Execute the command host followed by the name of your dns, as indicated in your configuration you must obtain the associated IP address. For example:
host raspi1
## answer
raspi1.mondc has address 172.21.0.1

host raspi1.mondc
## answer
raspi1.mondc has address 172.21.0.1
For more advanced use, use the dig command.
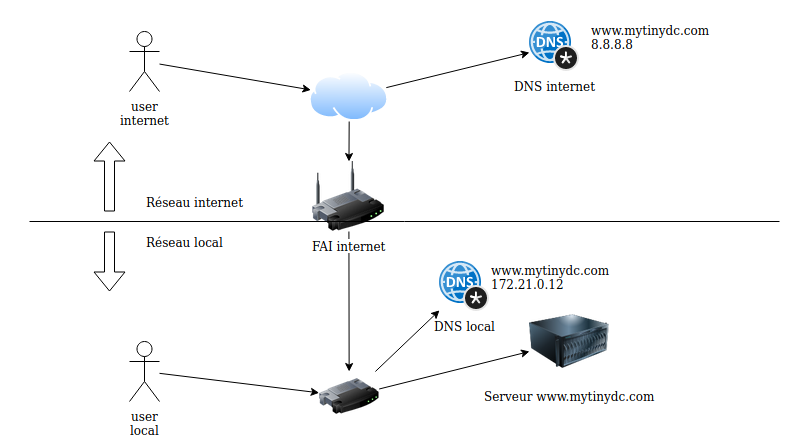
Internet domain duplication on a local network
This saves on Internet bandwidth and Simplification of service configurations. Let’s take the example of the “mytinydc.com” website. It is hosted on my datacenter. When I consult it “locally”, I don’t need to go out to the Internet. To perform this exercise, I declared on the DNS of the datacenter the “mytinydc.com” zone, and changed the final IP addresses to local IP addresses. If the datacenter is isolated from the Internet I still have local access to my site without changing the settings. So I have two zones to manage but this remains much less complicated than having to manage two different domains, and which would force me to use another domain “locally” to join the same service.
In order to fully realize this configuration you must indicate in the file /etc/resolv.conf the DNS name of your Datacenter first in the list of supported DNS. For example :
# DNS your daacenter
nameserver 192.168.1.15
# DNS OPENDNS
nameserver 208.67.222.222
If you type the opposite, the DNS will return the address of the server located on the Internet.
Errors Encountered
Bind9 service takes a long time to stop or restart.
This is a Firewall issue.
Source […] The named listens on two ports — port 53 on all network interfaces, and port 953 on the loopback interface (the latter being DNS RNDC Service). Both port numbers are mentioned in your log snippet.When it is being stopped/restarted, named waits for something on the port 953, and it hangs for a long time if the port is blocked by the firewall. So the solution is to allow incoming connections to the port 953 on the loopback interface:
Add those rules :
iptables -A OUTPUT -o lo -j ACCEPT
iptables -A INPUT -i lo -p tcp --dport 953 -j ACCEPT
iptables -A OUTPUT -o lo -p tcp -m tcp --sport 953  -m state --state RELATED,ESTABLISHED
Erreur failed: journal out of sync with zone
Example in the file /var/log/syslog :
Oct 18 19:54:35 raspi1 named[29551]: zone mondc/IN: journal rollforward failed: journal out of sync with zone
This error appears when the “serial” of the zone is lower than the last recorded by bind. The solution is to delete the log file (extension jnl) in the /var/cache/bind directory.
rm /var/cache/bind/mondc.db.jnl
# Restart DNS service
systemclt restart Bind9
FAILED: Has an address record but no DHCID, not mine.
Execute :
# deny field update requests
rndc freeze
# open the impacted DNS zone file /etc/bind/[zone file name]
# delete all entries followed by TXT, (including the TXT line)
# allows zone update requests and full DNS configuration review
rndc thaw
(Source)
zone …./IN: journal rollforward failed: jo
service bind stop
rm /var/cache/bind/*,jnl
service bind start
Summary
| Files used |
|---|
| /etc/bind/named.conf.local |
| /etc/bind/named.conf.options |
| /var/cache/bind/* |
| /etc/bind/rndc.conf |
| /etc/bind/rndc.key |
| Controls used |
|---|
| systemctl [ start | stop | restart ] Bind9 |
| rndc [ freeze | thaw ] |
| rndc-confgen -a |