(**) Translated with www.DeepL.com/Translator
It is necessary to take one’s time to follow the entire procedure which has been divided into several steps that can be carried out over several days…
Context
MytinyDC runs on an ARM-type architecture: armhf (32bits) and aarch64 (64 bits). The RaspberryPI foundation has made available a beta version of RaspiOS 64Bits, I therefore abandon Raspbian and RaspiOS 32bits.
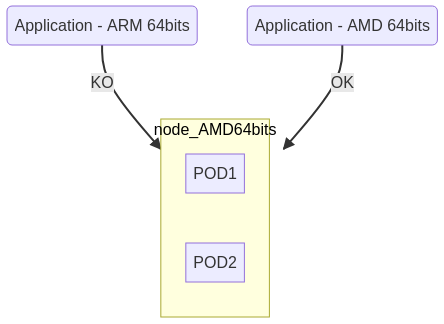
“Kubernetes” is supposed to support mixed CPU architectures, one of my goals is to allow the momentary addition of nodes more powerful than those used in everyday life, This POC will therefore integrate AMD64 and ARM 64-bit CPUs**.
This so-called hybrid topology only works if the “Docker” images are available in the format supported by the CPU of the node. If your cluster consists of “aarch64” units and you want to use a “Docked” application in “amd64” format, this will obviously not work. You will see that this attention must be paid at all levels of this installation, since Kubernetes is run in “Docker” containers.
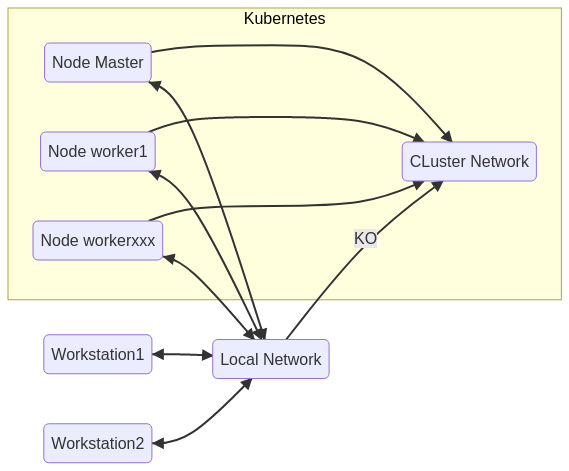
The installation of a “Kubernetes” Cluster requires a minimum of two computing units, called “nodes” (physical or virtual servers), a “Master” type node, and a “Worker” type node. The “Master” is used to manage the cluster, the “Workers” run the applications. If the “Master” falls, the “Workers” continue to run in their state, but the global state of the Cluster will no longer be available. If a change occurs at the “Workers” level, the “Master” being stopped, the other “Workers” will no longer be aware of it.
Another important thing, “Kubernetes” runs on a private network specific to the Cluster and inaccessible to machines that are not integrated in the Cluster. You will be able to access the nodes’ ssh service but not the Cluster’s private network. Each node of the Cluster has access to the other nodes of the Cluster.
NB : The shells proposed in this instruction are written in Bash and generated by the tool MytinyDC-automation.
Central units for this POC
- 1 “Master” node, rock64 (4Gb RAM - Gigabit Ethernet) - Debian10/aarch64 (64bits)
- 2 nodes “Worker”, Virtualbox virtual machines (2Gb RAM - Gigabit Ethernet) - Debian10/amd64 (64bits)
- 1 “Worker” node, RaspberryPi3 Minimum (1Gb RAM - Ethernet 100Mbps) - RaspiOS 64 Bits/aarch64 (64 bits - Kubernetes components for ARM are mostly available in 64 bits).
- 1 SSH console to access these machines.
Preparation of the central units
Install on each of the units, Debian10: Follow the procedure for installing operating systems.
After installation it is very important:
- to activate “Linux host bridge”.
- activate the “forward network”.
- to enable the notion of “cgroup” and disable the swap,
Enable “Linux host bridge”.
## bridge-nf-call
sysctl -w net.bridge.bridge-nf-call-ip6tables=1
sysctl -w net.bridge.bridge-nf-call-iptables=1
Activate the “forward network”.
sysctl -w net.ipv4.ip_forward=1
Activation of the “cgroup” concept and deactivation of the swap
Amd64 Platform
Edit the file “/etc/fstab”
# Comment on the line containing the word "swap".
# Example : UUID=7dd7bd28-a2e6-4ec9-87a8-af40ae6a0459 none            swap    sw              0       0
# Become :
#UUID=7dd7bd28-a2e6-4ec9-87a8-af40ae6a0459 none            swap    sw              0       0
Save and execute :
swapoff -a
## Or reboot
Cgroups are enabled by default on this type of platform.
ArmBian platform (Rock64)
Edit the file “/etc/default/armbian-zram-config” :
#remplace the line ENABLED=TRUE
#with
ENABLE=FALSE
Execute
swapoff -a
## Or rebooter
Cgroups are enabled by default on ArmBian.
RaspiOS platform - 64 Bits (RaspberryPi)
dphys-swapfile swapoff
dphys-swapfile uninstall
update-rc.d dphys-swapfile remove
apt-get -y purge dphys-swapfile
To activate “cgroups”
sed -i '$ s/$/ cgroup_enable=cpuset cgroup_enable=memory cgroup_memory=1 swapaccount=1/' /boot/cmdline.txt
reboot.
Installation of a “Master” type node
This requires a server ready to use (LAN connection, internet access, ssh access) and set up as described above.
You will find here an example of a shell allowing the installation of a “Master” node:
Download the Node Master installation shell
Connect “root” to the server intended to become the “Master” in your cluster “Kubernetes”. (the notion of high availability, multi-Master is not discussed here).
wget https://www.mytinydc.com/dl/mytinydc_kubernetes_install_node_master.sh
chmod +x mytinydc_kubernetes_install_node_master.sh
# View the contents of the file
cat ./mytinydc_kubernetes_install_node_master.sh
# Execute - remove # comment tag
# ./mytinydc_kubernetes_install_node_master.sh
At the end of the installation, the shell indicates the command to be executed on each node of type “Worker”, in order to make them “join” the cluster. It is useless to keep a copy of it. We will see later, how to generate a new command of this type.
Installation of the CNI (Container Network Interface)
This network component is necessary for the operation of “Kubernetes”. (see here)
I tried several of them and I chose “flannel”: it’s popular, easy to install, supported by ARM CPUs. Flannel is here : (https://github.com/coreos/flannel).
The CNI is installed on the Master node with the command :
kubectl apply -f https://raw.githubusercontent.com/coreos/flannel/master/Documentation/kube-flannel.yml
Download the CNI Flannel installation shell for the Master node
wget https://www.mytinydc.com/dl/mytinydc_kubernetes_install_cni_flanner.sh
chmod +x mytinydc_kubernetes_install_cni_flanner.sh
# View the contents of the file
cat ./mytinydc_kubernetes_install_cni_flanner.sh
# Execute - remove # comment tag
#./mytinydc_kubernetes_install_cni_flanner.sh
NB : The Master node is in charge of “distributing” the network plugin to the “Worker” nodes, when they join the Cluster. In the context of a hybrid environment at the CPU architecture level of the “Worker” nodes, it is important to choose a CNI supported by the platforms that will join the Cluster.
Add a “Worker” type Node
Adding a node to the cluster is relatively simple, you have to prepare a server, since a node is a server (virtual or physical) as indicated in the first part, then execute a set of instructions :
- installation of the necessary Debian packages
- command to join the cluster. First of all, the authorizations allowing a node to join the cluster must be generated, this is done on the master. Executing this command will obtain the command to be executed on the “Worker” nodes so that the latter are authorized to join the cluster. On the master :
kubeadm token create --print-join-command
You get this type of result:
kubeadm join 192.168.0.33:6443 --token 709pj7.h1e4x7z06eolg8h8 --discovery-token-ca-cert-hash sha256:668fa27ba6967f6613aa7aea8a60a120461eb0f9a17285ac1900f1a4395494ce
On the Worker node : You can execute this script : Download the installation shell of a Worker node
wget https://www.mytinydc.com/dl/mytinydc_kubernetes_install_node_worker.sh
chmod +x mytinydc_kubernetes_install_node_worker.sh
# View the contents of the file
cat ./mytinydc_kubernetes_install_node_worker.sh
## Attention the parameter must be indicated between double-quotes. ""
# Execute - remove # comment tag
#./mytinydc_kubernetes_install_node_worker.sh "[Résultat de la commande kubeadm exécutée sur le master]"
Wait during the installation, once finished, go to the Master and run kubectl get nodes, the new node should appear and “Ready”.
Post-installation checks
Node control
The “Master” is installed and ready, type the command kubectl get nodes -o wide, make sure that the IP address (column “EXTERNAL-IP”) matches the IP address of the server on the local network.
For example, if your server of type “Master” is reachable from the network with the IP address “192.168.0.38”, the column “EXTERNAL-IP” must indicate this value :
NAME      STATUS   ROLES    AGE     VERSION   INTERNAL-IP    EXTERNAL-IP   OS-IMAGE                       KERNEL-VERSION       CONTAINER-RUNTIME
debian1   Ready    <none>   4d11h   v1.19.2   192.168.0.39  <none>        Debian GNU/Linux 10 (buster)   4.19.0-10-amd64      docker://18.9.1
rock64    Ready    master   4d11h   v1.19.2   192.168.0.38  <none>        Armbian 20.08.3 Buster         4.4.213-rockchip64   docker://18.9.1
If this is not the case, you get for example :
NAME      STATUS   ROLES    AGE     VERSION   INTERNAL-IP    EXTERNAL-IP   OS-IMAGE                       KERNEL-VERSION       CONTAINER-RUNTIME
debian1   Ready    <none>   4d11h   v1.19.2   172.17.0.1   <none>        Debian GNU/Linux 10 (buster)   4.19.0-10-amd64      docker://18.9.1
rock64    Ready    master   4d11h   v1.19.2   172.17.0.1   <none>        Armbian 20.08.3 Buster         4.4.213-rockchip64   docker://18.9.1
r
Note that the address of each node (column “EXTERNAL-IP”) indicates 172.17.0.1, it appears that the flannel plugin “gets tangled” when there are several network interfaces, which is the case with virtual machines (LAN, bridge docker, etc…).
To fix this problem, edit the “/etc/hosts” file of each node with the name of the node and its real ip. Example with “debian1 :
vi /etc/hosts
Delete the line 127.0.1.1 debian1 and add the line :
192.168.0.39 debian1
and do the same on each node, adapting with the network configuration of the node.
Once the operation is done on each node, remove the pods related to “flannel”, Example : kubectl delete pod -n kube-system kube-flannel-ds-fflvz. To obtain the list of these pods :
kc get pod -A | grep kube-flannel
The pods will be recreated automatically by “Kubernetes” and correctly configured this time. Check with the command kubectl get nodes -o wide.
Control of the overall operation
At this stage, it is important to control the state of the cluster network, the network is paramount. If the network is unstable, your cluster will not work.
Process control
This shell allows you to check on the “Master” node that all necessary processes are running.
Download the process test shell
From the “Master” node :
wget https://www.mytinydc.com/dl/mytinydc_kubernetes_processus_test.sh
chmod +x mytinydc_kubernetes_processus_test.sh
# View the contents of the file
cat ./mytinydc_kubernetes_processus_test.sh
# Execute - remove # comment tag
#./mytinydc_kubernetes_processus_test.sh
Endpoint control
This shell allows you to check the minimal functioning of the available endpoints.
Download the endpoints test shell
From the “Master” node :
wget https://www.mytinydc.com/dl/mytinydc_kubernetes_ping_test_endpoints.sh
chmod +x mytinydc_kubernetes_ping_test_endpoints.sh
# View the contents of the file
cat ./mytinydc_kubernetes_ping_test_endpoints.sh
# Execute - remove # comment tag
#./mytinydc_kubernetes_ping_test_endpoints.sh
Internal DNS control
This shell allows you to check the minimal functioning of the internal DNS “Kubernetes”.
Download the internal DNS test shell
From the “Master” node :
wget https://www.mytinydc.com/dl/mytinydc_kubernetes_dns_test.sh
chmod +x mytinydc_kubernetes_dns_test.sh
# View the contents of the file
cat ./mytinydc_kubernetes_dns_test.sh
# Execute - remove # comment tag
#./mytinydc_kubernetes_dns_test.sh
Administration tools
Your everyday alienation: the “kubectl” command.
The name of this command is a bit too long for my taste, so I created a command alias named “kc”. A command alias under Linux is often the short name of a command frequently used by a sysadmin. Under Linux an alias is declared as follows:
alias kc=/usr/bin/kubectl
To customize you can use a variable as follows:
# Alias kubectl (selon votre choix, pour moi c'est kc)
ALIASKUBECTL="kc"
alias $ALIASKUBECTL=/usr/bin/kubectl
To make this customization persistent, you have to add these commands to your “.bashrc” file located in the “home directory” of the Linux user.
Another very interesting feature is the automatic completion of “Kubernetes”. The implementation is delivered in the “Kubernetes” package: kubectl completion bash. The execution of this command indicates all the configuration commands necessary for “bash” to get an automatic completion.
Let’s make it persistent, this operation will consist in defining the alias of “kubeclt” and integrate the automatic completion at each connection of the kubernetes administrator to the “master” console (you can customize the alias) :
# Arbitrary control if already exists in the file ~/.bashrc
grep -e "kubectl completion bash" ~/.bashrc
if [ "$?" == "1" ];then
cat <<EOT >> ~/.bashrc
###>>> Configuration for Kubernetes
# Alias kubectl (selon votre choix, pour moi c'est kc)
ALIASKUBECTL="kc"
alias \$ALIASKUBECTL=/usr/bin/kubectl
# completion bash integration
source <(kubectl completion bash)
# Added completion rules to my alias
if [[ $(type -t compopt) = "builtin" ]]; then
    complete -o default -F __start_kubectl \$ALIASKUBECTL
else
    complete -o default -o nospace -F __start_kubectl \$ALIASKUBECTL
fi
###<<<
EOT
fi
And to work - Kubernetes - Cheatsheet
Installation of a Docker functional verification application
To check that the deployment and service system is working properly, we will deploy our first, very simple application, a nginx server that returns its default page.
Namespace
The “namespaces” are like the drawers of a storage cabinet, everything in its place … If you don’t specify a namespace, the deployment will be automatically “stored” in the toted-out “namespace”, named “default”.
Let’s create the “kube-verify” namespace
kubectl create namespace "kube-verify"
PS : You can also use the shortcut “ns” for the “namespace” object, ex: kubectl create ns “kube-verify”.
Deployment
Connect to the “Master” node, then create the file “deployment-nginx-kubeverify.yaml” with this content :
apiVersion: apps/v1
kind: Deployment
metadata:
  name: nginx
  namespace: kube-verify
spec:
  strategy:
    type: Recreate
  selector:
    matchLabels:
      app: nginx
  replicas: 1
  template:
    metadata:
      labels:
        app: nginx
    spec:
      containers:
      - name: nginx
        image: nginx
        ports:
        - containerPort: 80
This description allows you to install the ngnix container on “Worker” nodes, this deployment will be “stored” in the “kube-verify” namespace.
Save and execute the command :
kubectl apply -f deployment-nginx-kubeverify.yaml
In this situation, the cluster is able to continuously maintain an instance of nginx, i.e. start a pod consisting, in this case, of a container allowing the execution of the “nginx” web server.
The deployment is done by checking with :
kubectl get deployment -n kube-verify
PS : The shortcut for the object “deployment” is “deploy”, ex : kubectl get deploy -n kube-verify
This command lists all deployments located in the namespace “kube-verify”.
NAME    READY   UP-TO-DATE   AVAILABLE   AGE
nginx   1/1     1            1           70m
We have a deployment named “nginx” as described in the yaml installation file, and there is a pod (1/1) started on a requested instance (notion of replicas). To get the full description of the pod started and linked to this deployment, run the command :
kubectl get pods -n kube-verify
PS : The shortcut for the object “pods” is “pod”, ex : kc get pod -n kube-verify
vous obtenez un résultat de la sorte :
NAME                     READY   STATUS    RESTARTS   AGE
nginx-7848d4b86f-jlkzk   1/1     Running   0          75m
Note that the pod contains the name of the deployment as well as a unique id.
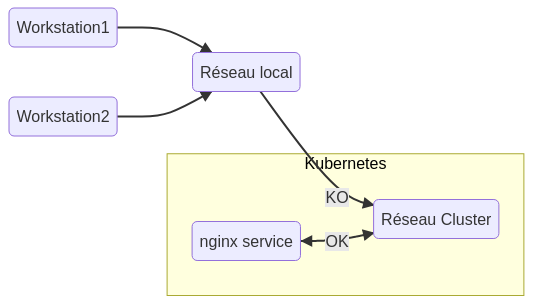
The pod “runs”, but nginx is not exposed in the cluster. The “network” exposure of an application is done through a service. To get the list of services :
kubectl get services -A
the “-A” option allows to inspect all “namespaces”
PS : The shortcut for the object “services” is “svc”, ex : kubectl get svc -A
You get this type of result :
NAMESPACE     NAME         TYPE        CLUSTER-IP     EXTERNAL-IP   PORT(S)                  AGE
default       kubernetes   ClusterIP   10.96.0.1      <none>        443/TCP                  16h
kube-system   kube-dns     ClusterIP   10.96.0.10     <none>        53/UDP,53/TCP,9153/TCP   16h
There is no service for nginx so you can reach it from nowhere. Let’s expose our service (in a very simplistic way):
kubectl expose deploy nginx -n kube-verify
let us recall the order which lists the exposed services :
kubectl get svc -A
You get this type of result :
NAMESPACE     NAME         TYPE        CLUSTER-IP       EXTERNAL-IP   PORT(S)                  AGE
default       kubernetes   ClusterIP   10.96.0.1        <none>        443/TCP                  16h
kube-system   kube-dns     ClusterIP   10.96.0.10       <none>        53/UDP,53/TCP,9153/TCP   16h
kube-verify   nginx        ClusterIP   10.109.211.116   <none>        80/TCP                   2s
Now let’s check the access to nginx, we see that it is exposed on ip 10.109.211.116 and port 80/TCP, let’s try with the command “curl”.
curl 10.109.211.116:80

<!DOCTYPE html>
<html>
<head>
<title>Welcome to nginx!</title>
<style>
    body {
        width: 35em;
        margin: 0 auto;
        font-family: Tahoma, Verdana, Arial, sans-serif;
    }
</style>
</head>
<body>
<h1>Welcome to nginx!</h1>
<p>If you see this page, the nginx web server is successfully installed and
working. Further configuration is required.</p>

<p>For online documentation and support please refer to
<a href="http://nginx.org/">nginx.org</a>.<br/>
Commercial support is available at
<a href="http://nginx.com/">nginx.com</a>.</p>

<p><em>Thank you for using nginx.</em></p>
</body>
</html>
The service works correctly, we arrive on the nginx page by default.
Note that the exposure is only accessible from the whole Cluster, that is to say, from the machines making up the Cluster.
The application pods are executed on “Worker” type nodes, it is these nodes that allow a wider exposure of the services. To expose a service at the node level, thus accessible from the network to which it belongs, you must specify the type “NodePort” when creating the service, by default, the exposure is of type “ClusterIP”. (One of many tutorials on service exhibitions)
Let’s expose the nginx service at the node level :
# delete the service
kubectl delete svc nginx -n kube-verify
# Create new service NodePort type
kubectl expose deploy nginx -n kube-verify --type=NodePort
Let’s see the result :
kubectl get svc -A

NAMESPACE     NAME         TYPE        CLUSTER-IP      EXTERNAL-IP   PORT(S)                  AGE
default       kubernetes   ClusterIP   10.96.0.1       <none>        443/TCP                  17h
kube-system   kube-dns     ClusterIP   10.96.0.10      <none>        53/UDP,53/TCP,9153/TCP   17h
kube-verify   nginx        NodePort    10.109.158.59   <none>        80:32020/TCP             61s
The nginx service is exposed :
- For the cluster on : 10.109.158.59:80
- But also on port 32020 of the node, or nodes (high availability cases), on which the “nginx” application is executed.
So we’re going to search on which node the “nginx” pod is executed on, we know that the application is located in the “kube-verify” namespace, and I’m going to ask for a “large” display of the information :
kubectl get pod -n kube-verify -o wide

NAME                     READY   STATUS    RESTARTS   AGE    IP           NODE      NOMINATED NODE   READINESS GATES
nginx-7848d4b86f-jlkzk   1/1     Running   0          138m   10.244.3.2   debian3   <none>           <none>
I see that the pod is executed on the node “debian3”, I execute the curl command indicating the name of the node or its ip and the port defined by the service (32020 in my case) :
curl debian3:32020

<!DOCTYPE html>
<html>
<head>
<title>Welcome to nginx!</title>
<style>
    body {
        width: 35em;
        margin: 0 auto;
        font-family: Tahoma, Verdana, Arial, sans-serif;
    }
</style>
</head>
<body>
<h1>Welcome to nginx!</h1>
<p>If you see this page, the nginx web server is successfully installed and
working. Further configuration is required.</p>

<p>For online documentation and support please refer to
<a href="http://nginx.org/">nginx.org</a>.<br/>
Commercial support is available at
<a href="http://nginx.com/">nginx.com</a>.</p>

<p><em>Thank you for using nginx.</em></p>
</body>
</html>
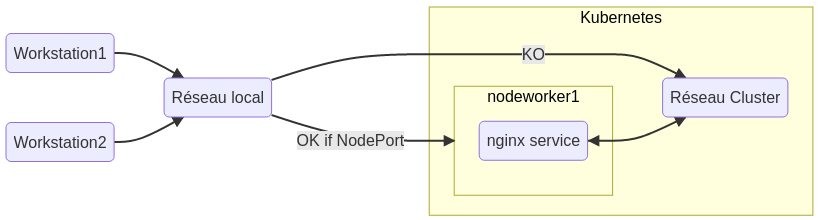
Our nginx service is now accessible from our local network, so it can be easily exposed on the internet via a nginx or haproxy reverse-proxy.
You will have to indicate in the backend, the list of all the nodes of the cluster, then the port of the service. The reverse proxy will detect which node is, or is not accessible. The reverse-proxy will perform the redirection automatically.
Removing the kube-verify service
# delete the service
kubectl delete svc nginx -n kube-verify
# Delete the namespace - please wait
kubectl delete namespace "kube-verify"
Uninstall Kubernetes (for info)
To be operated on each node :
wget https://www.mytinydc.com/dl/mytinydc_kubernetes_uninstall.sh
chmod +x mytinydc_kubernetes_unistall.sh
# View the contents of the file
cat ./mytinydc_kubernetes_unistall.sh
# Execute - remove # comment tag
#./mytinydc_kubernetes_unistall.sh
Download the Kubernetes uninstall shell
Problems encountered
| Symptoms | action |
|---|---|
| Kubelet doesn’t start on one or more nodes | Disable swap |
| Error at installation error execution phase preflight: [preflight] Some fatal errors occurred: [ERROR SystemVerification]: missing required cgroups: memory | activate “cgroups” |
Conclusion
“Kubernetes”… You always wonder what it’s for?
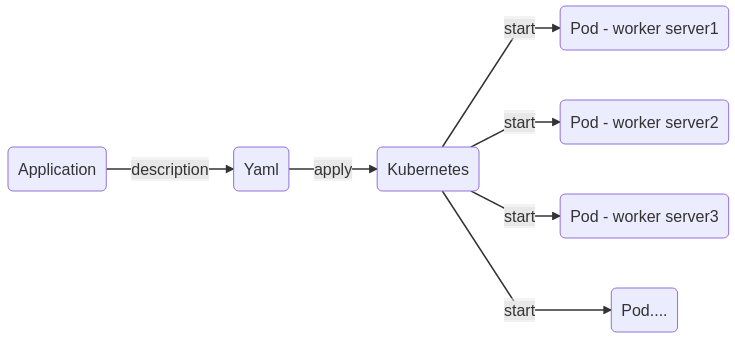
This first approach allows to demonstrate that the process of starting an application, within the cluster, is described in a single file: the image to install, the network port to expose. As you continue, you will discover that you can add a shared storage space, a shared configuration…
With these notions it is easy to understand that once described, our application can be instantiated several times with the same settings, without any particular intervention.
Please note that “Kubernetes” was designed by and for Cloud providers. The latter had to find a solution to meet the incessant demand for container provisioning and looked for a way to streamline the application availability process. This may seem obscure at first, but you will soon become familiar with the concept.
Keep in mind that all nodes in the Cluster have access to the same resources that are described and stored by the “Master” node. This type of architecture allows you to provide services with very high availability.