
(**) Translated with www.DeepL.com/Translator
Update 05/07/2023 Comment of Jay : debian package “pkg-config” is needed now. This documentation has been updated.
Update 20/03/2020 To activate VoIP
Update 05/11/2019 I have been using this service on production units (Rock64/Raspberry PI) for several months now. I have a Rock64 server for Matrix and a Rock64 server for Postgres RDBMS. My instance is federated to another instance that is hosted on a single Rock64 (Matrix-Posgresql). No defect has been found, we are about ten to use it daily. Here you will find some telemetry data
Update 23/05/2019 - Show your Matrix-Synapse service on the Internet, as part of a self-hosting program. I refer you to this post:https://www.mytinydc.com/en/blog/sysadmin-exposition-internet-nextcloud/ whose content is easily adaptable to this service.
Update 18/05/2019 - Synapse-Matrix compilation works on a Raspberry PI3 armhf : the procedure is identical to that of Rock64 (compilation time > 20 minutes). This operation was performed as part of a load balancing test with HAPROXY. These tests revealed that it is impossible to use two servers simultaneously for the same database, be careful this damaged the integrity of the database, some rooms quickly became inaccessible.
The Matrix/Element.io service (https://matrix.org(https://matrix.org)) is an instant messaging service, such as Slack, Whatsapp, Messenger, Hangout, but entirely open source and decentralized. You have certainly heard about it, since it is the messaging system chosen by the French government to replace Whatsapp and which has been “hacked” since its launch (http://www.leparisien.fr/high-tech/tchap-la-messagerie-chiffree-du-gouvernement-deja-victime-d-une-faille-de-securite-18-04-2019-8056314.php). Coded in Python, the solution is very fast and can be installed on a rock64 (arm64 platform), or even a Raspberry but I haven’t tested it. The designers recommend 1 GB of RAM for a comfortable use. This post is therefore related to the installation of the Matrix service on an arm64 platform (Rock64).
This video shows the operation and use of the Matrix/Element.io package:https://youtu.be/TUgQ7Qh754
Proposed topology
The topology I propose is the one I use, the messaging is very fast (10 simultaneous users and federated to two other domains), the load is minimal, accessible from all over the world 24/7.
My Datacenter is composed of 6 units. The instantaneous power consumption of the unit, including an 80mm fan, is 25 watts.
The unit operates in a rather harsh environment, 33 degrees Celsius can exceed 38 degrees, and 80% humidity, without air conditioning, for the “proof of concept”, for 18 months without service interruptions.
Activist for the decentralization of the Internet, this installation also proves that we can do without WhatsApp, Hangout, Messenger and other messaging held by the great leaders of the Internet.
And fully encrypted from start to finish, for which only you (including your contacts) hold the encryption keys and the entire data storage.
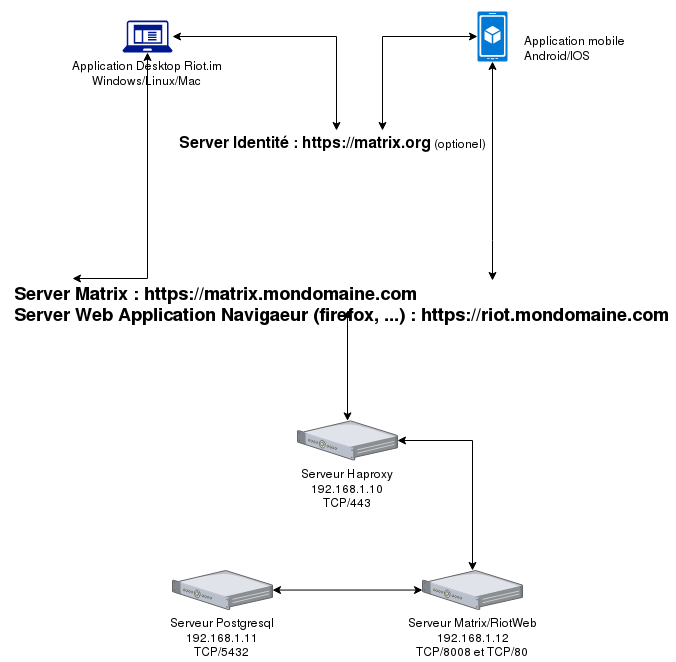
The topology presented here, implements 3 units (servers):
- Haproxy Server
- IP address : 192.168.1.10
- Raspberry PI3 or Rock64
- Postgresql Server :
- IP address : 192.168.1.11
- Raspberry PI3 or Rock64
- Matrix Server:
- IP address : 192.168.1.12
- Rock64 (arm64) in this topology
The installation of the Element-web web application is optional, since “mobile and desktop” clients do not require HTML support. If you decide to install Element-web, it is because you want to access your email through a web browser.
Postgresql service installation
Nothing complicated, I’ll use the account “synapse”, password “synapse” (I recommend a more robust password), to access the database “synapse”. Connected root to the server, type the following instructions:
Service installation
apt install postgresql
su - postgres
# Creation of the user synapse and the database synapse
createuser synapse
psql
ALTER USER synapse WITH ENCRYPTED password "synapse";
CREATE DATABASE synapse ENCODING "UTF8" LC_COLLATE='C' LC_CTYPE='C' template=template0 OWNER synapse;
\q
exit
Postgreql listening address setting
If you are hosting the Postgresql service on the same server used to host the Matrix-Synapse service, skip this step.
By default Postgresql listens on the address: localhost:5432. If you want to expose this service on your network you will need to change this configuration. If your server has the IP address: 192.168.1.11
vi /etc/postgresql/[Postgresql version]/main/postgresql.conf
Look for the line: listen_addresses =‘localhost’ and comment on this line :
#listen_addresses = "localhost
Add (adapt to your configuration)
listen_addresses ='192.168.1.11'.
Save and exit vi : ESC : wq
Restart Postgresql
systemctl restart postgresql
Setting up access to the postgresql service
You use two separate servers - Matrix and Postgresql Server - Network access
The access to the postgresql service is configured through parameters located in the file /etc/postgresql/[Postgresql version]/main/pg_hba.conf
vi /etc/postgresql/[Postgresql version]/main/pg_hba.conf
Add at the end of the file
host synapse synapse 192.168.1.12/32 md5
(*) 192.168.1.12 is the IP address of the unit that will host the Matrix/Synapse service - adapt according to your configuration
You use a single server for both services - Matrix and Postgresql Server - Local access
Just after this line
local all postgres peer
Add this line
local synapse synapse md5
Reload the Postgresql configuration
systemctl reload postgresql
Schematic of the postgresql database
The Matrix service is in charge of importing the schema from the database.
HAPROXY and SSL Encryption
If you don’t know what the HAPROXY application is in your architecture, skip this chapter.
You will notice that the HAPROXY accesses to the final server (Matrix and Apache2) are configured for the “http” protocol and not “https”, while the access urls are of the “https” type. In my topology, it is the HAPROXY server that makes the https support, the communication between the HAPROXY server and the final servers remains “in clear”, since in my case the area is “secure”.
This is done for optimization purposes, always try to use a number only once in the communication chain, as much as possible. This avoids unnecessary server loads and can have a significant impact on the cost of using Cloud resources. Encryption is not an insignificant operation for a microprocessor.
Installation and configuration of the HAPROXY service
If you don’t know what the HAPROXY application is in your architecture, skip this chapter.
I don’t go into details about this service, the documentation is very rich on the internet, the following settings correspond to a reverse proxy service (Layer 7), for the Matrix service, and the web application Element (Optionnel).
HAPROXY installation
apt install haproxy
Add the reverse proxy for the matrix and Element service, you must first have the domain names related to these services.
In this example I have chosen: matrix.mydomain.com and element.mydomain.com and you will need the corresponding SSL certificates, in HAPROXY (pem) format
vi /etc/haproxy/haproxy/haproxy.cfg
and add this content by adapting it to your configuration:
frontend 192.168.1.1.10:443https
   acl matrix.mydomain.comssl hdr(host) -i matrix.mydomain.com
   acl element.mydomain.comssl hdr(host) -i element.mydomain.com
   use_backend matrix.mydomain.comssl if matrix.mydomain.comssl
   use_backend element.mydomain.comssl if element.mydomain.comssl
  backend matrix.mydomain.mydomain.comssl
        http mode
        enabled
        roundrobin balance
        server matrix 192.168.1.1.12:8008 check weight 10 maxconn 500
   backend element.mydomain.comssl
       http mode
      enabled
     roundrobin balance
     server element 192.168.1.1.12:80 check weight 10 maxconn 500
Synapse/Matrix service installation
Project compilation
The compilation of the project is carried out as indicated in the official documentation
Environmental preparation
Install the necessary packages:
apt -y install build-essential make python3 python3-dev python3-virtualenv python3-pip python3-setuptools libffi-dev libpq-dev  python3-cffi zlib1g-dev libxml2-dev libxml2 libxslt1-dev libssl-dev libjpeg-dev python3-lxml virtualenv postgresql-server-dev-all pkg-config
mkdir -p /opt/synapse
virtualenv -p python3 /opt/synapse/env
cd /opt/synapse
. /opt/synapse/env/bin/activate
pip install --upgrade pip
pip install --upgrade setuptools
pip install matrix-synapse[all]
Expected result :
Collecting matrix-synapse[all]
[...]
Successfully installed ... matrix-synapse-[version number] ...
Generation of the configuration file for synapse-matrix
This command will create the file: /opt/synapse/homeserver.yaml
python3 -m synapse.app.homeserver --server-name matrix.mydomain.com --config-path homeserver.yaml --generate-config --report-stats=no

deactivate
Service configuration
All Matrix settings are made in the file /opt/synapse/homeserver.yaml
Attention the YAML syntax does not support tabulations
vi /opt/synapse/homeserver.yaml
Adapt these parameters to your own:
[..]
server_name: "matrix.mydomain.com"
[..]
#IP listening parameters :
listeners:
- port: 8008
    tls: false
    # Replace the IP address 192.168.1.12 with the IP address of the server used to run Matrix-Synapse
    bind_addresses: ['192.168.1.12']
    # Or for all interfaces: bind_addresses: ['0.0.0.0']
    type: http
    x_forwarded: true
    resources:
       - names: [client, federation]
         compress: false
#Database parameters :
[..]
##Comment the sqlite3 part :
#The database engine name
#name: "sqlite3"
#Arguments to pass to the engine
#args:
#Path to the database
#database: "/opt/synapse/homeserver.db"
# And add:
database:
  name: psycopg2
  args:
    user: synapse
    password: synapse
    database: synapse
    # Replace the IP address (192.168.1.11) with the IP address used by the Postgresql database server.
    # If the Posgresql and Matrix-Synapse services are on the same server specify: localhost as IP address
    host: 192.168.1.11
    # By default Postgresql is set to listen on port 5432, if you have changed this setting indicate the port actually used
    port: 5432
    cp_min: 5
    cp_max: 10
Identity server (optional)
Associating an account with an email is optional in Matrix. If you forget your password, you will need to connect to an identity server or change it directly in the database. By default the Element-im application defines the Matrix.org organization’s server: https://vector.im but for having tried it, this service does not work, prefer: https://matrix.org
You can also install your own identity server (not covered in this documentation).
Add lines or uncomment existing lines:
default_identity_server: https://matrix.org
trusted_third_party_id_servers:
      - matrix.org
Prometheus probe - Grafana display (optional)
If you have a Prometheus monitoring service and want to enable metric collection, you will need to add a listener:
listeners:
  - port: 9092
    type: metrics
    bind_addresses: ['0.0.0.0']
#and activate the "metrics"
enable_metrics: true
Then set up your Prometheus service. There is a dashboard at Grafana (ID 10046)
Systemd configuration
addgroup synapse
adduser --system --home /opt/synapse/ --no-create-home --disabled-password --shell /bin/nologin --ingroup synapse synapse
Create the systemd file
vi /etc/systemd/system/matrix-synapse.service
And add this content
[Unit]
Description=Matrix Synapse service
After=network.target

[Service]
Type=forking
WorkingDirectory=/opt/synapse/
ExecStart=/opt/synapse/env/bin/synctl start
ExecStop=/opt/synapse/env/bin/synctl stop
ExecReload=/opt/synapse/env/bin/synctl restart
User=synapse
Group=synapse
Restart=always
StandardOutput=syslog
StandardError=syslog
SyslogIdentifier=synapse

[Install]
WantedBy=multi-user.target
Service activation at server startup
systemctl enable matrix-synapse
Media storage directory and permissions
The generated configuration file automatically stores the media (photo, files, etc…) sent to the mailbox in the “/opt/synapse/media_store” and “/opt/synapse/uploads” directories. These directories do not exist. Create these directories:
mkdir /opt/synapse/media_store /opt/synapse/uploads
#Assign the necessary permissions to the account/group running the service (see the systemd file created above)
chmod 770 /opt/synapse/media_store /opt/synapse/uploads
# Allow matrix to write its logs in /opt/synapse
chmod 755 /opt/synapse
chown synapse:synapse /opt/synapse /opt/synapse/media_store /opt/synapse/uploads
Firewalls
- HAPROXY server
- OUTPUT: TCP/8008 + INPUT Return Rule (STATE ESTABLISHED, RELATED)
- OUTPUT: TCP/80 (if using Element-web web service) + INPUT Return Rule (STATE ESTABLISHED, RELATED)
- INPUT: TCP/443 + OUTPUT Return Rule (STATE ESTABLISHED, RELATED)
- Postgresql server
- INPUT: TCP/5432 + OUTPUT Return Rule (STATE ESTABLISHED, RELATED)
- Matrix server
- INPUT: TCP/80 (if using Element-web web service) + OUTPUT Return Rule (STATE ESTABLISHED, RELATED)
- INPUT: TCP/8008 + OUTPUT Return Rule (STATE ESTABLISHED, RELATED)
Starting the service
#Enable continuous log reading
tail -f /var/log/syslog &
#Starting the Matrix service
systemctl start matrix-synapse
The log display shows:
After 24 19:14:14:15 localhost systemd[1]: Starting Matrix Synapse service....
Apr 24 19:14:24 localhost synapse[3877]: 2019-04-24 19:14:24,693 - root - 211 - WARNING - None - _ STARTING SE
RVER _
Apr 24 19:14:24 localhost synapse[3877]: 2019-04-24 19:14:24,773 - root - 214 - WARNING - None - Server /opt/synapse
se/env/lib/python3.5/site-packages/synapse/app/homeserver.py version 0.99.3
Apr 24 19:14:24 localhost synapse[3877]: 2019-04-24 19:14:24,774 - root - 216 - INFO - None - Server hostname: mat
rix.mydomain.com
Apr 24 19:14:24 localhost synapse[3877]: 2019-04-24 19:14:24,779 - twisted - 242 - INFO - None - Redirected stdout
/stderr to logs
Apr 24 19:14:24 localhost synapse[3877]: 2019-04-24 19:14:24,937 - synapse.app.homeserver - 358 - INFO - None - Pr
eparing database: psycopg2....
After 24 19:14:25 localhost synapse[3877]: 2019-04-24 19:14:25,146 - synapse.storage.prepare_database - 223 - INFO -
 None - Upgrading schema to v53
Apr 24 19:14:25 localhost synapse[3877]: 2019-04-24 19:14:25,167 - synapse.app.homeserver - 376 - INFO - None - Da
tabase prepared in psycopg2.
Apr 24 19:14:25 localhost synapse[3877]: 2019-04-24 19:14:25,168 - synapse.server - 222 - INFO - None - Setting up
.
Apr 24 19:14:25 localhost synapse[3877]: 2019-04-24 19:14:25,348 - synapse.storage.event_push_actions - 471 - INFO
None - Searching for stream ordering 1 month ago
Apr 24 19:14:25 localhost synapse[3877]: 2019-04-24 19:14:25,378 - synapse.storage.event_push_actions - 477 - INFO
None - Found stream ordering 1 month ago: it's 2
Apr 24 19:14:25 localhost synapse[3877]: 2019-04-24 19:14:25,380 - synapse.storage.event_push_actions - 479 - INFO
None - Searching for stream ordering 1 day ago
Apr 24 19:14:25 localhost synapse[3877]: 2019-04-24 19:14:25,407 - synapse.storage.event_push_actions - 485 - INFO
None - Found stream ordering 1 day ago: it's 2
Apr 24 19:14:25 localhost synapse[3877]: 2019-04-24 19:14:25,427 - synapse.server - 226 - INFO - None - Finished s
etting up.
After 24 19:14:14:26 localhost synapse[3877]: Starting...
Apr 24 19:14:14:26 localhost synapse[3877]: started synapse.app.homeserver('homeserver.yaml')
type now:
fg
then CRTL+C to stop the "tail" scrolling
If the start traces have a dependency error:
systemctl stop matrix-synapse
cd /opt/synapse
source /opt/synapse/env/bin/activate
pip3 install requests
deactivate
systemctl daemon-reload
systemctl start matrix-synapse
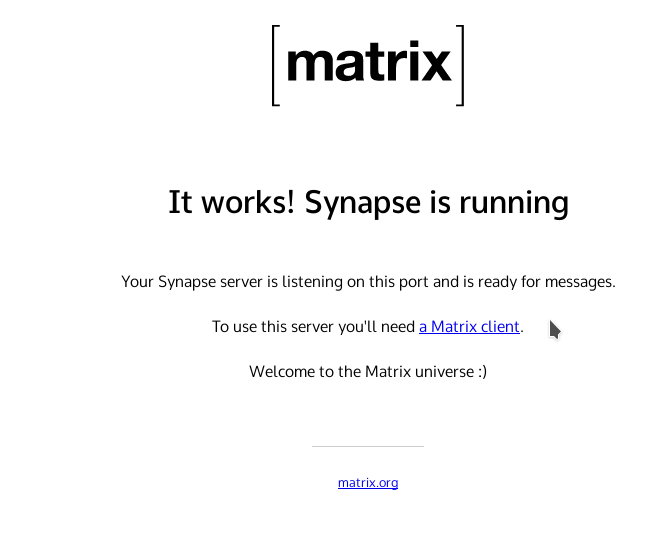
Start your browser, then type the url : https://matrix.mondomaine.com, if you have a self-signed certificate on the HAPROXY server, you will have to accept the exclusion. Please note that the Matrix.org federation is only possible by using certificates from certification authorities. If you want to acquire an SSL certificate for free, look on the LetsEncrypt side. Matrix is not equipped with an HTML interface, so only this page will appear:
Creating the first account
It will be a question of creating the administrator account. The latter will have access to all the server parameters (create rooms, configure rooms, etc…).
At this stage of the procedure, the following command will use the Domain Name Resolution System (DNS). In this example I decided to assign the domain name (FQDN) to the Matrix service: matrix.mydomain.com
Domain name resolution
The command that creates the first user will try to connect to the domain specified in its settings.
If you have a DNS service on your network, set it so that this command can resolve the domain name provided as a parameter.
You do not have a DNS service on your network? No problem, add this resolution to the “/etc/hosts” file.
A line in a hosts file consists of an IP address and one or more names. Still in this example I will add (refer to the topology of this example):
vi /etc/hosts
# and add
192.168.1.12 matrix.mydomain.com
Register, and check immediately: ping matrix.mydomain.com, the answer must come from 192.168.1.12
Account creation
Connect to the server console, and type:
Adapt this command with your parameters : domain name, port
Example for the topology presented:
/opt/synapse/env/bin/register_new_new_matrix_user -c /opt/synapse/homeserver.yaml http://matrix.mondomaine.com:8008
The console asks you to enter the account name, password and answer “yes” to the question “Make admin”:
New user localpart[root]: admin
Password: xxxxxxxxx
Confirm password: xxxxxxx
Make admin[no]: yes
Sending registration request....
Success
Server administration
As I mentioned earlier, the server does not have a management interface as such, you will have to go through a client. I advise you the most accomplished: Element.
This application has (almost) all the functions to administer the server, access to the administration functions is managed according to the user’s authorization level in a room.
Element-web application installation
This part is optional, and necessary only if you do not want to install the mobile or desktop application, but prefer to use it by web browser. This will require the installation of a web server, which will be responsible for sending the Element application (html/javascript) to connected clients. Nothing complicated since it is a static site, no handler to set up.
Apache2 web service installation
Connected “root” to the “Matrix” server, type :
apt install apache2
The websites are located in the directory /var/www/html/
Static website installation
Go to https://github.com/vector-im/element-web/releases and copy the download url of the latest version of Element-web (extension.tar.gz)
cd /var/www/html/
wget[paste the url of the file to download] Ex: wget https://github.com/vector-im/element-web/releases/download/v1.7.20/element-v1.7.20.tar.gz
#extract the archive
tar xfz[name of the tar.gz archive] Ex: tar xfz element-v1.7.20.tar.gz
chown -R www-data:www-data:www-data[name of the created directory] Ex: chown -R www-data:www-data element-v1.7.20
# Deletion and creation of the symbolic link to the new version, this avoids the modification of the vhost each time the version is changed
rm element;ln -s element-v1.7.20 element
Creation of the virtualhost file for the domain: element.mydomain.com
vi /etc/apache/site-available/element.mydomain.com.conf
and add this content by adapting it to your settings:
<VirtualHost default:80>>
         ServerName element.mydomain.com
         ServerAdmin webmaster@localhost
         DocumentRoot /var/www/html/element
         ErrorLog ${APACHE_LOG_DIR}/ error-element.mydomain.com.log
         CustomLog ${APACHE_LOG_DIR}/access-element.mydomain.com.log combines
</VirtualHost>
Vhost Activation
a2ensite element.mydomain.com
#Reloading the apache configuration
systemctl reload apache2
You can change the url presented automatically by the interface:
#Copy the file config.sample.json to config.json
cp /var/www/html/element/config.sample.json /var/www/html/element/config.json
vi /var/www/html/element/config.json
# and change the urls: in this example

"default_hs_url": "https://matrix.mondomaine.com",
"default_is_url": "https://matrix.org",
For the other parameters, if you don’t know what they correspond to, consult the Element-web documentation, or delete them from the configuration file.
Now open your browser and point it to your domain: http://element.mondomaine.com to connect see the procedure below.
Note that the apache server is configured for the “http” protocol and not “https”. This is a static site, intended to be downloaded once, in this case the web server is only used to send the html/javascript codes, and does not perform any action with the Matrix server. If you want to encrypt this part, see the previous chapter on SSL encryption.
Installation of Element clients (mobile and/or Desktop)
I refer you to the Element website from where you can download the client adapted to your platform.
Connection to the Matrix server
ATTENTION: The client on which you install Element should be able to resolve domain names, if you use a name in your url. If you do not have a DNS service on your network infrastructure, specify the resolution in the “hosts” file of your system".
Start the Element client, by default, it offers a connection to the Matrix.org servers, click on “change”, indicate in the “url of the host server” box: “httpS://matrix.mydomain.com “, if you have set up a HAPROXY SSL service,
if not, use the IP address of the server that hosts the Matrix application: “http://[IP address]:[Matrix Port]”
Ex: http://192.168.1.10:8008 when Matrix listens on port 8008.
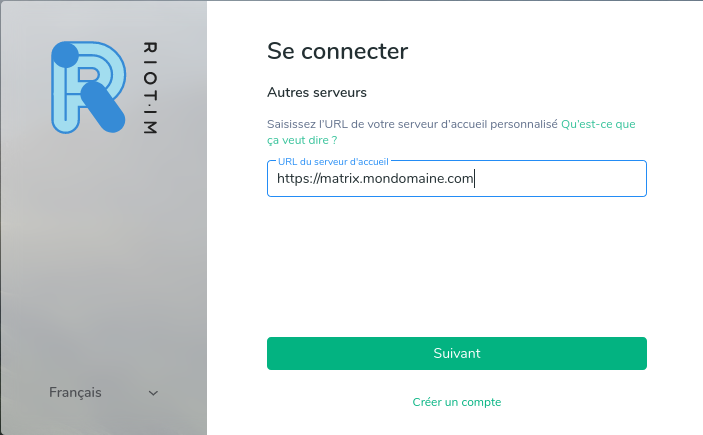
Click on “Next”, then enter the “admin” account, and the password chosen previously.
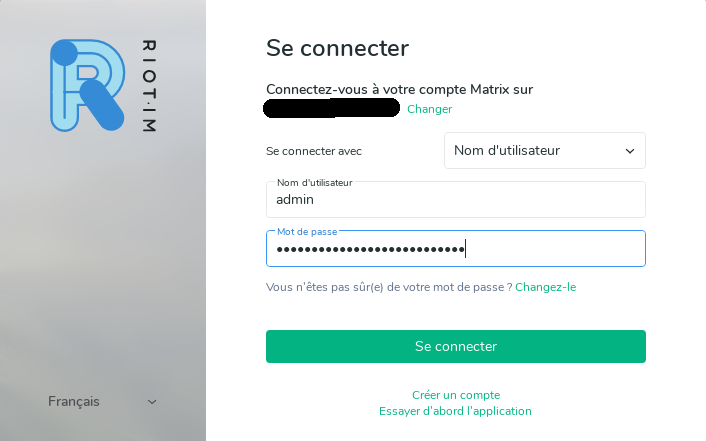
You are connected….

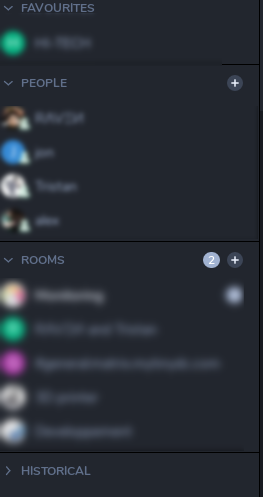
Create your room. You will not be able to invite, via the “Invite to this room” button, users of your instance (see the chapter Add an account) and those connected to the identity server.
You will discover a user-friendly, robust, fast, very complete space and I invite you to read the documentation of this tool (not covered in this post).
Add an account
In my context: private messaging, this implies that automatic registration has been disabled. This is the parameter: “enable_registration: false” located in the configuration file of the service matrix: /opt/synapse/homeserver.yaml.
If you modify this file, execute the command :
systemctl restart matrix-synapse
(restart of the service to take into account the configuration change).
I therefore create accounts as and when requested. The procedure is the same as for creating the first account. Attention: To the question “Make admin[no]”, press “Enter” or indicate no. New users are not administrators in my context.
I indicate a “strong password” (generated by apg) that I communicate to the user and specify that he must change it during his first visit.
Resetting a password
If you are connected to an identity server, follow the procedure on the home page, otherwise Matrix comes with a tool located here: /opt/synapse/env/bin/hash_password
Just run it, provide a password, confirm.
/opt/synapse/env/bin/hash_password
The tool will indicate the “hashage”, copy this value.
Connect “root” to the postgresql server console, then type :
su - postgres
psql synapse
SELECT * FROM users;
UPDATE users SET password_hash='[hash value]' WHERE name='[username such as @foo:matrix.mydomain.com';
\q
exit
source : https://blog.cavebeat.org/2018/02/reset-password-for-matrix-synapse-accounts
Then log in with the password used to calculate the “hashage”.
Integration of a Bot (go-neb)
The bot allows you to extend the functionality of your messaging: integration of animated Gifs (Giphy), integration of Prometheus alert messages (monitoring application developed by Soundcloud), refer to this article:https://www.mytinydc.com/index.php/2019/04/25/installation-du-bot-go-neb-pour-synapse-matrix-arm64/
Matrix-Synapse server update (update 04/05/2019)
Before updating the Matrix-Synapse server, save the Postgresql database and the installation directory.
# Connected to the Matrix-Synapse server
# Matrix-Synapse code location: /opt/synapse
# backup as tar+gz archive
tar cfz /root/backup-matrix-synapse-[datejour].tgz /opt/sysnapse
# Log in to the Postgresql database server and save the "synapse" database
# Matrix-Synapse service shutdown
systemctl stop matrix-synapse
# Code update
cd /opt/synapse
source /opt/synapse/env/bin/activate
pip install --upgrade pip
pip install --upgrade setuptools
pip install --upgrade matrix-synapse[all]
The update starts:
Collecting matrix-synapse[all]
[...]
Successfully built matrix-synapse
Installing collected packages: matrix-synapse
Found existing installation: matrix-synapse 0.99.3 Uninstalling matrix-synapse-0.99.3:
Successfully uninstalled matrix-synapse-0.99.3 Successfully installed matrix-synapse-0.99.3.2
Continue with these commands:
#Delete the environment
deactivate
If the unit to which you are connected is not the Matrix server but a compilation unit, create a “/opt/synapse/env” archive and then deploy it on the final server
tar cfz /root/matrix-synapse.tgz /opt/synapse/env/
# connection to the Matrix-Synapse server: copy the previous archive into /root/ then :

systemctl stop matrix-synapse
cd /
tar xfz /root/root/root/matrix-synapse.tgz
chown -R synapse:synapse /opt/synapse/env
rm /root/matrix-synapse.tgz
systemctl start matrix-synapse

# Start Matrix-Synapse
systemctl start matrix-synapse
Expose the service on the Internet
To configure the exposure of your Matrix messaging on the Internet, I refer you to the post dedicated to the Nextcloud exposure (to be adapted to your Matrix environment).
https://www.mytinydc.com/index.php/2019/05/23/nextcloud-exposez-votre-instance-sur-internet/
Federation
(update 06/05/2019)
The federation allows synapse servers to communicate with each other. To test this federation, I will attach as indicated in the documentation, the room “`#synapse:matrix.org”.
Attention the federation only works when your Matrix service is exposed on the internet.
By default servers communicate on port 8448, if you change this port, you will have to inform the network by creating specific DNS records, see the doc.
HAPROXY and Firewall
The service being distributed on several machines I will detail for each one the configuration to be modified.
HAPROXY server and its firewall
The topology does not change, the Haproxy server is responsible for intercepting client requests.
I add the federation port (TCP/8448) in the HAPROXY configuration, the backend matrix does not change either and I use the same one. Mine is already set up for the HTTPS backend (TCP/443) and named “matrix.mydomain.comssl”
frontend 192.168.168.1.10:8448https
    http mode
    enabled
    bind 192.168.1.1.10:8448 ssl crt matrix.mydomain.com.pem
    default_backend matrix.mydomain.comssl
I open the TCP/8448 port in the Firewall configuration of this server.
The service is now available from other Matrix-Synapse servers.
Matrix-Synapse Server
This server will need to communicate with the federated servers. To allow federation with “matrix.org”, open the configuration file of your server and uncomment the lines: “federation_domain_whitelist:”, “trusted_key_servers:”. Add on top of each of these attributes, by prefixing with spaces and not tabs, the domain name to be federated. In this case “matrix.org”, in order to obtain this :
trusted_key_servers:
      - matrix.org
federation_domain_whitelist:
      - matrix.org
Save and exit, restart the matrix-synapse service
systemct restart matrix-synapse
This same operation must be performed on the federated server but with your domain name.
You must also set its firewall so that the matrix server can reach the port of the authorized federation, e. g. domain.federe.com: 8448 TCP
Open your Element application, connected to your server, then let’s try to join the room: #synapse:matrix.org
Click on the “+” button after “Rooms”
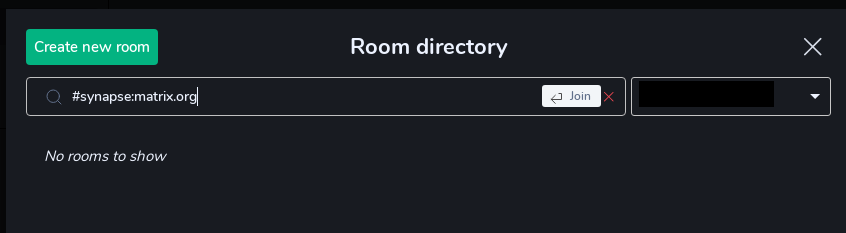
And enter the name of the room “`#synapse:matrix.org” located on the matrix.org server and I get an error :

I restart the process by inspecting the Firewall traces of my matrix-synapse server, and I see attempts to connect to an IP address belonging to Cloudfare on the port…… 8443.

Matrix.org does not federate on 8448 (it is allowed to federate on a different port (Matrix federation documentation). I modify the firewall settings of this server, by allowing access to port 8443 of the “matrix.org” domain, I do not specify the ip. If they use cloudflare, it is possible that the domain ip may change. And I repeat the process to join the room:

I click on “Click here” to join the room

The federation is in place for the matrix.org domain. The federation creates a copy of the salon of the federated site, I advise you against the federation from existing large salons, replication takes a lot of time and often does not succeed. There are several discussions on this subject, because today the federation is limited to very large computing units….
To test the proper functioning of the federation you can use this url:
https://federationtester.matrix.org/api/report?server_name=[domain name of your matrix server]
This test gives a federation report.
Conclusion
Because Matrix did the “Buzz”, I became interested in their product very ready. I have chosen to install this service, to replace RocketChat. Which is also a good product, but in the end, not very suitable for the small units I use. Rocketchat takes more than 5 minutes to start, and spontaneously consumes all CPU power several times a minute, for no good reason. The Mongolian base (also for arm64) crashed several times, and after three months of use, it seemed a little slow.
The installation of the Matrix/Element.io couple is quite simple, no significant difficulties encountered during installation. During the first hours of use (3 people), we posted about a hundred messages, photos and the server load remained very low. Response times have nothing to do with RocketChat response times, especially for image uploads, and Gifs. Very interesting feature in Element, you can disable the automatic start of Gifs and videos. Markdown support is excellent, as well as message response tracking.
Mobile notifications are very reactive. I would like to come back to this point. Some have criticized, and for good reason, the fact that the French government’s messaging system was not really sovereign, in the sense that the notification mechanism (PUSH system) goes through Google’s Firebase services (https://firebase.google.com/docs/cloud-messaging/). Indeed, metadatas and their routing allow Google to know who is connected to this private network, and the title of the group concerned, but in no case, the ability to read the message. The French government should have chosen and maybe have done so, an installation on Android with the opensource package manager “FDroid”, which offers a Element client not using Google’s FireBase network. But uses a mechanism of repeated interrogation of the server (non push). If you too are concerned about the metadata passing through Google in this way, be aware that the “Fdroid” installation option is the answer to your question. And last but not least, metrics are quite important in a data center. The Matrix service is not to be outdone on this side. It provides very relevant and above all very complete information (CPU usage, Garbage collector, database access statistics, etc…). And obviously, I abandoned Rocketchat.
_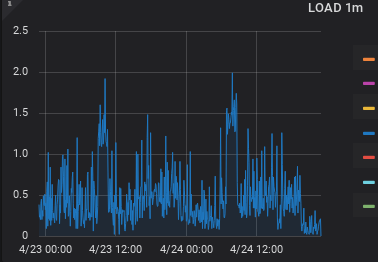 This curve shows the descent after stopping RocketChat and starting Matrix…. (Monitoring carried out with Prometheus and Grafana on Raspberry PI3)
_ Waiting time for connections to the postgresql database (Rock64/4GB)
Expose your Matrix-Synapse service on the Internet
As part of a self-hosting, you will expose your email service on the Internet. I refer you to this post:https://www.mytinydc.com/index.php/2019/05/23/nextcloud-exposez-votre-instance-sur-internet/(https://www.mytinydc.com/index.php/2019/05/23/nextcloud-exposez-votre-instance-sur-internet/) whose content is easily adaptable to this service.
Be careful if you use a VPN, modify the configuration of Matrix, so that it listens on all interfaces:
modify the “bind_addresses” parameter of the /opt/synapse/homeserver.yaml file as follows: “bind_addresses: [‘0.0.0.0’]”
and restart the service: **_systemctl restart matrix-synapse
Going further
- Load balancing of the Matrix service (be careful, I started this chapter and damaged the service by starting two instances on separate servers and “loadbalanced” with Haproxy, this implementation is not enough and has caused access errors to active rooms…). For the moment I have two servers, with only one instance started and “hearbeat” between the two. When the master stops, the slave starts the matrix-synapse service. To return to the initial state, stop the matrix-synapse service on the slave and then start the matrix-synapse service on the master. This configuration works… but is not suitable for “pure” load balancing.
- Load balancing of the Postgres database (postgres-XL - multi master) * Automatic database backup
- Access security with HIDS (Ossec for example)
- Implementation of “rate limiters”
- Integrate Bots for the collection of monitoring information, Giphy support, etc…
This document was reviewed by Tristan, who performed the complete “from scratch” installation on a Rock64 unit from a fully reset operating system. Please leave your comments if you are confronted with cases not specified in this document.
Document licence : Creative Commons (CC BY-NC-ND 4.0)
THIS DOCUMENTATION IS PROVIDED "AS IS", WITHOUT WARRANTY OF ANY KIND AND DISTRIBUTED FOR EDUCATIONAL PURPOSES ONLY. THE AUTHOR, CONTRIBUTORS TO THIS DOCUMENTATION OR ©MYTINYDC.COM SHALL IN NO EVENT BE LIABLE FOR ANY DIRECT OR INDIRECT DAMAGE THAT MAY RESULT FROM THE APPLICATION OF THE PROCEDURES IMPLEMENTED IN THIS DOCUMENTATION, OR FROM THE INCORRECT INTERPRETATION OF THIS DOCUMENT.