
(**) Translated with www.DeepL.com/Translator
How to expose your NextCloud instance, or any other services, hosted at home, on the Internet?
Two possibilities:
- By setting up your Internet router (Box),
- via a virtual private server (VPS), the most reasonable solution.
Setting up your Internet Box (fiber optic router or ADSL).
There are so many types of routers (Box) that it is impossible for me to detail them here. But when we talk about this type of operation, it is more generally a question of adding NAT (address translation) rules. The first thing to do is to make the main entrance address of your MiniDatacenter fixed, to make sure that it will always have the same IP address. Then set up the router (Box), so that packets arriving on a specific port (443 here) are redirected to the address and port of your MiniDatacenter.
If your ISP does not provide you with a Fixed IP address, you will need to set up a dynamic DNS update service, so that the domain name you have chosen is always associated with the IP address of your Box, which changes randomly and is decided by your ISP.
This solution does not work if your provider, as I do in India, does not provide a public IP address (direct Internet exposure address) to each connected user, but passes traffic through a single point on the Internet, or, if your ISP blocks direct incoming traffic, to your Box.
Another problem may also arise when generating the LesEncrypt SSL certificate….
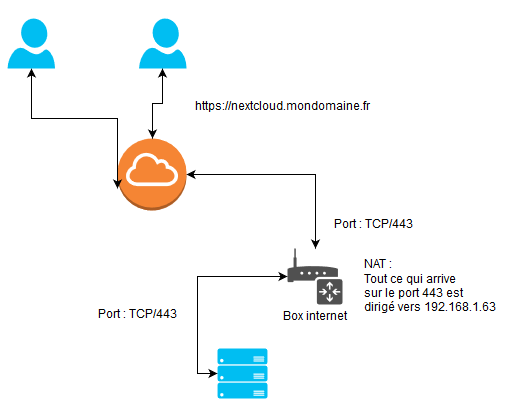
NAT operations on a router exposed on the Internet
Virtual private server
This is the most interesting solution, but of course not free. Many data centers offer Virtual Private Server solutions. You can find offers starting at 3€/month without any commitment.
To reduce the invoice, share this rental with other users.
What interests me in this type of service is its bandwidth, regardless of the server’s power and storage capacity.
The virtual server will have only two services: OpenVPN, and HAPROXY, so very easy to maintain.
OpenVPN will allow you to connect your MiniDatacenter to the VPS server, and thus allow its exposure on the Internet, while HAPROXY will distribute traffic to VPN clients according to the Url received (Haproxy layer 7).
If you share this service with other users, the configuration does not change. There will be several Openvpn clients connected to the VPS.
You will need to ensure, for everyone’s safety, that Openvpn clients cannot communicate with each other.
This system has several advantages:
- inexpensive,
- easy to maintain,
- Intrusion detection intercepted by the final servers and forwarded to the intrusion detection server (allows sharing in the event of attacks),
- does not require NAT to be installed on your internet box,
- Data center isolation can be instantaneous (Openvpn service shutdown),
- you benefit from the Firewalls of the infrastructure in which the VPS server is hosted,
- only alternative solution when your Internet service provider does not offer NAT on your connection,
- you can move your MiniDatacenter anywhere without any configuration changes.
Preparation of the virtual private server
After ordering your virtual private server, the provider offers SSH access with the “root” login and password.
Changing the “root” password
Log in to this server and immediately change the access password. You can generate it with the “apg” tool:
apt install apg
apg
passwd
#Enter the new password and confirm.
Ssh access control by key
Check that there is no file with the name “authorized_keys”
#This command searches and deletes this type of file.
find / -name "authorized_keys" -exec rm -f {}\;
These files often allow Datacentre administrators to connect to them without having a user password.
This case is less and less frequent, but I have already met it in some data centers.
Load balancing service installation - HAPROXY
This service allows you to communicate with exposed or unexposed servers on the Internet in a way that is transparent to the user. It also allows you to distribute the load of a service such as a website, a chat application, etc… by distributing requests over several servers.
To install the “haproxy” service, execute the following command:
apt install haproxy
VPN service installation - Openvpn
I refer you to my very detailed instruction on installing a secure Openvpn server: https://www.mytinydc.com/index.php/mytinydc-openvpn/
Final Topology
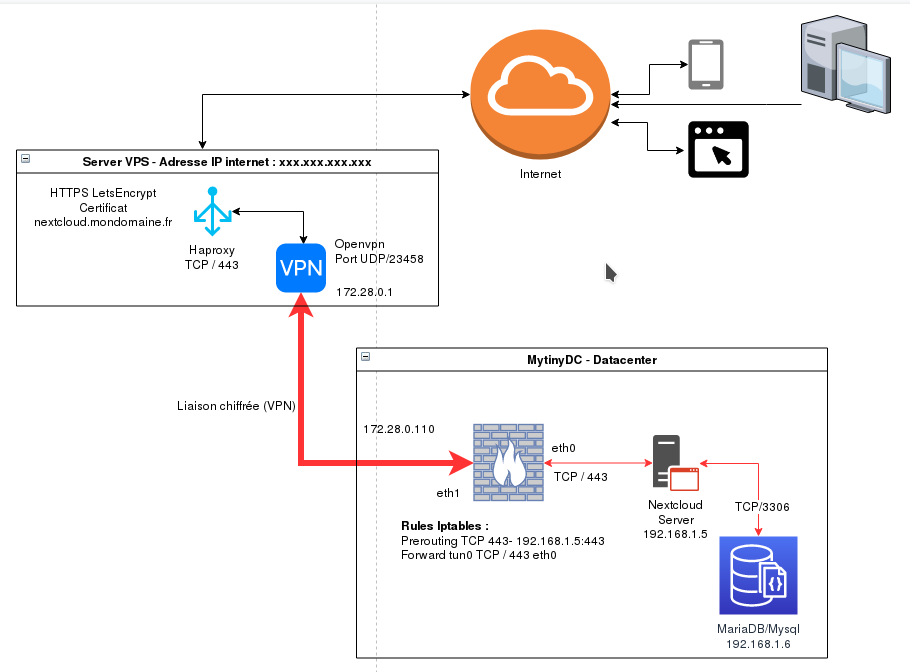
Firewall configuration
- VPS : INPUT TCP/443 - INPUT[Proto Openvpn]/[Port Openvpn]
- MINIDATACENTER : I don’t go into details, several cases are possible (PREROUTING, or flow to another Haproxy,…)
HAPROXY parameter setting
Once the VPN communication between your Datacenter and the VPS is established, in a stable way, it is time to configure the HAPROXY distributor. The latter will be the interface between Internet users and your Datacenter.
You have purchased the domain “mondomaine.fr”, create a type A record, with the name “nextcloud”, and the exposed IP address of your VPS, in my example it will be “1.2.3.4”. Wait for DNS propagation. (command: host nextcloud.mydomain.fr). This order must show the address of your VPS (required to create the LetsEncrypt SSL certificate).
Create the file /etc/haproxy/haproxy/haproxy.cfg by indicating this content that you will need to adapt to your configuration.
global
    log /dev/log local0
    log /dev/log local1 notice
    chroot /var/lib/haproxy
    stats socket /run/haproxy/admin.sock mode 660 level admin
    stats timeout 30s
    use haproxy
    group haproxy
    daemon
    ca-base /etc/ssl/certs
    crt-base /etc/haproxy/certs
    ssl-default-bind-bind-ciphers ECDH+AESGCM:DH+AESGCM:ECDH+AES256:DH+AES256:ECDH+AES128:DH+AES:RSA+AESGCM:RSA+AES:!aNULL:!MD5:!DSS
    ssl-default-bind-options no-sslv3
    tune.ssl.default-dh-param 2048
defaults
    global log
    http mode
    httplog option
    option includinglognull
    retries 3
    redispatch option
    contstats option
    http-server-close option
    maxconn 2000
    timeout connect 5000
    client timeout 7200000
    timeout server 7200000
    default-server inter 15s rise 2 fall 3
    option forwardfor
    errorfile 400 /etc/haproxy/errors/400.http
    errorfile 403 /etc/haproxy/errors/403.http
    errorfile 408 /etc/haproxy/errors/408.http
    errorfile 500 /etc/haproxy/errors/500.http
    errorfile 502 /etc/haproxy/errors/502.http
    errorfile 503 /etc/haproxy/errors/503.http
    errorfile 504 /etc/haproxy/errors/504.http
frontend **1.2.2.3.4**:443httpssl
    http mode
    bind 1.2.3.3.4:443 ssl crt nextcloud.mydomain.fr.pem
    enabled
    acl nextcloudmondomaine.frssl hdr(host) -i nextcloud.mydomaine.fr
    use_backend nextcloudmondomaine.frssl if nextcloudmondomaine.frssl
    backend nextcloudmondomaine.frssl
        http mode
        enabled
        server nextcloudmytinydc 172.28.0.0.10:443 ssl verify none check weight 100 maxconn 50
Creating an SSL certificate (https) with LetsEncrypt
LetsEncrypt is a certification authority for HTTPS certificates, as are other companies offering this service. Except that obtaining a certificate is free of charge.
Thus browsers, applications, will no longer present errors or messages indicating that the certificate is not verified by a certification authority. To create a LetEncrypt certificate, please refer to the documentation:https://letsencrypt.org/
WARNING: In the configuration of the proposed VPS server, the latter has the HAPROXY service, which according to its configuration uses ports 80 and/or 443 (respectively http and https). To create your certificates, certbot launches a service that also listens, by default, on ports 80 or 443.
Shell - Creating a certificate
This shell is very simple, takes as a parameter the name of the certificate to create. You must check, before, the effective DNS propagation of the domain name, relative to the certificate to be created. LetsEncrypt uses DNS services to perform basic owner checks.
Create the file /root/LetsEncrypt-addcert.sh by indicating this content :
#!/bin/bash
if [ "$1" ="" ];then
       echo "Indicate the domain name to be managed"
       exit
fi
export DOMAIN=$1
certbot certonly --standalone --preferred-challenges http --tls-sni-01-port 30033 -n --rsa-key-size 4096 -d $DOMAIN
bash -cc's cat /etc/letsencrypt/live/$DOMAIN/fullchain.pem /etc/letsencrypt/live/$DOMAIN/privkey.pem > /etc/haproxy/certs/$DOMAIN.pem'
Then execute:
chmod 750 /root/LetsEncrypt-addcert.sh
(*) The use of port 30033** is a choice of the administrator who executes the command. By default LetsEncrypt uses ports 80 and 443 but already used by the HAPROXY service.
The default key length is 2048 bits, it is now recommended to use a 4096 bit key.
Shell - Certificate renewal
Certificate renewal is performed by the cron task /etc/cron.d/certbot
When used with HAPROXY, this task does not concatenate certificates to obtain a valid".pem" file for HAPROXY. Therefore,
Add at the end of the line of the file **/etc/cron.d/certbot ** :" && /root/LetsEncrypt-renewcert.sh"
0 */12 * * * * * root test -x /usr/bin/certbot -a ! -d /run/systemd/system && perl -e'sleep int(rand(43200))' && certbot -q renew** && /root/LetsEncrypt-renewcert.sh
The concatenation will be automatic after the execution of certbot. Create the file /root/LetsEncrypt-renewcert.sh by indicating this content :
#!/bin/bash
PATHCERT="/etc/letsencrypt/live"
PATHCERTHAPROXY="/etc/haproxy/certs"
DIRS=``they `$PATHCERT`````
if [ "$DIRS" ="" ];then
        echo "No certificate found on this server"
        exit 1
fi
#Route of the installed certs and creation of Haproxy PEMs
for DOMAIN in $DIRS
do
       if [ -d "$PATHCERT/$DOMAIN" ];then
                echo "Concat $PATHCERT/$DOMAIN/fullchain.pem $PATHCERT/$DOMAIN/privkey.pem to $PATHCERTHAPROXY/$DOMAIN.pem"
                cat $PATHCERT/$DOMAIN/fullchain.pem $PATHCERT/$DOMAIN/privkey.pem > $PATHCERTHAPROXY/$DOMAIN.pem
        fi
done
# Reload HAPROXY configuration
systemctl reload haproxy
Then run:
chmod 750 /root/LetsEncrypt-renewcert.sh
VPS server sharing
To reduce costs, we can share the HAPROXY service between several actors. Each will have a VPN access key, and an administrator will be responsible for managing the certificates and configuration of the HAPROXY service.
Haproxy service security
You should pay attention to the logs of this service, especially if you share the use. The logs, and this related to the implementation of the services implemented, may contain urls containing sensitive metadata such as access tokens etc…. This is not related to the raw security of the HAPROXY service but to the edge effects that can occur if these logs are misused. Pay attention to protecting access to these traces of their storage life,….
Openvpn service security
This can present security problems, in the case where VPN clients, once connected, can communicate with each other.
By default, Openvpn does not enable this service, but you will need to ensure with tools, such as “tcpdump”, that traffic is blocked between these different actors.
Because if Openvpn does not enable this service in its configuration (option “client-to-client”), it may turn out that the kernel does its routing work as for any other interface. You can disable the Forward of the IP stack and/or add an iptables rule preventing Forward between actors:
FORWARD -i[interface name] -o[interface name] -j DROP
You will find an excellent explanation here: https://serverfault.com/questions/736274/openvpn-client-to-client
The management of VPN access certificates (openvpn) is made very easy with the tool associated with Openvpn, which I developed and which you can find here: https://www.mytinydc.com/index.php/mytinydc-openvpn/
Conclusion
Of course, you can adapt this “Nextcloud” case to other services, such as Matrix-Synapse-Element.io instant messaging, Rocketchat, etc…
Document licence : Creative Commons (CC BY-NC-ND 4.0)
THIS DOCUMENTATION IS PROVIDED "AS IS", WITHOUT WARRANTY OF ANY KIND AND DISTRIBUTED FOR EDUCATIONAL PURPOSES ONLY. THE AUTHOR, CONTRIBUTORS TO THIS DOCUMENTATION OR ©MYTINYDC.COM SHALL IN NO EVENT BE LIABLE FOR ANY DIRECT OR INDIRECT DAMAGE THAT MAY RESULT FROM THE APPLICATION OF THE PROCEDURES IMPLEMENTED IN THIS DOCUMENTATION, OR FROM THE INCORRECT INTERPRETATION OF THIS DOCUMENT.