(**) Translated with www.DeepL.com/Translator
We have seen through this post[https://www.mytinydc.com/index.php/2018/09/13/pine64-rock64-bootp-pxe/] (/index.php/2018/09/13/pine64-rock64-bootp-pxe/), how to start a unit without an SD card, only through the network and using the Bootp protocol.
We will now see how to install the Debian operating system in an automated way. This procedure allows you to provision a new server in less than 4 minutes….
What can be automated?
Debian system installation
The NFS server will have a disk image, the content of which must be placed on the SD card of the new server, and after booting “Bootp”. Human intervention necessary, or not….
The configuration of some services
The following configurations are identical for all Datacenter servers:
- The configuration of the Email service (exim4)
- the “local” regional parameters
- their geographical location, which determines their production time zone (tzdata)
- the parameters of the OSSEC intrusion detector,
- the minimum parameters of the monitoring client probes
- …
Network connection permissions
To administer, or execute certain services, you must install some SSH keys, allowing the different actors, perfectly identified to connect to it and perform tasks. List of actors :
- the Backup server (backup/restore)
- the Datacenter manager (DCIM) administration server
- …
Automation methods
All the above-mentioned points can be easily automated. These different techniques can be used:
- Template copy system. These are configuration models created by the administrator
- copy of a public key (id_rsa.pub), clearly identified to a file “.ssh/authorized_keys”
- install additional Debian packages, from official repositories or from packages available on the local network (dpkg -i)
- reconfiguration of packets according to precise parameters
- ….
To perform these operations, after being clearly stated, you can choose to use “Ansible”, “Puppet”, “Chef”,…
In my case, I developed a “mytinydc-automation” tool (see post), which allows to write pseudo-scripts in Bash (called robot).
**And don’t forget to document this process.
Status of the new server after a network startup
We have seen that it is possible to discriminate Bootp starts according to the type of platform (X86, ARM).
An “amd64” platform does not use the same binary files as an “arm64” or “armhf” server. Therefore the Bootp configuration differs according to the platform. What is certain is that once started, these servers “cause” all this common language: “bash”, integrated in all Linux distributions.
So it is from this language that I will build the engine that will allow the installation of a Debian system on a blank unit. The tests I have performed have shown that the Raspberry Pi3 and Rock64 units have an integrated SD card reader called a “hotplug”.
Start these types of units over the network, connect via SSH, continuously read the file “/var/log/syslog”, insert an SD card, you will have signals indicating that the Kernel takes into account this SD card.
From now on you can install anything on it and then restart the server, which this time will restart on its SD card and not over the network.
This leads us to understand: The unit has a bootable SD card, the server starts from it. In the case of a blank SD card, the server will boot on the network. It is therefore quite possible to start a server from the network with a blank SD card inserted.
Specifications (example)
- The future server must be prepared to start from its network card
- The Datacenter must allow this new unit to be booted from the network (DHCP/Bootp service configuration)
- The server started by the network uses the system located on the NFS server.
- The NFS server will have the Debian system image and relative to the platform type of the new server.
- The installation can only start if the SD card is detected as inserted.
- The installation generated a strong password, to access it via SSH, once the server is installed.
- The Automatons are available either on the NFS server or on the Datacenter management server (preferred)
- The installation can be executed, as desired, from the server console started by the network, or from the Datacenter management server (preferred)
- The backup server and the data center management server will have SSH access to the new server once installed. I use Backuppc for backups and MytinyDC-IM for data center management. Therefore, the public ssh keys of the “backuppc” and “mytinydcim” accounts will need to have SSH access to the new server, after installing a Debian system on its SD card.
- The OSSEC service will be installed and configured from a template (model).
- The Prometheus monitoring service will be installed and configured from a template (node_exporter au minumum).
- The firewall configuration will allow the use of the OSSEC and Prometheus services.
Step-by-step installation procedure
Starting the unit on the network
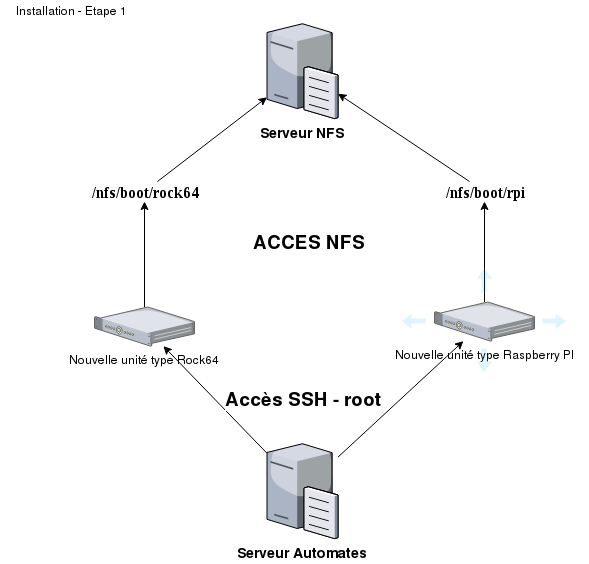
You must ensure that the unit is properly started by the network. Its operating system is hosted on the NFS server. Therefore any direct actions on the NFS server files will have an impact on the behavior of the unit started by the network.
Automata - Root access
The installation Automata must have “root” access via SSH to the unit started by the network. Insert the contents of the Automata public key (.ssh/idrsa.pub) into the /root/.ssh/authorized_keys file located on the NFS server and for the platform in question. Indeed, the NFS server can be an operating system for different types of platforms. In my case, I have the directories “/nfs/boot/rock64*” for units of type “Rock64 - arm64” and “*/nfs/boot/rpi_” for units of type “Raspberry PI - armhf”.
Perform an SSH connection test, from the account used to launch the Automatons, to the “root” account of the server started by the network.
Installing a Debian system on the SD card
Insert an SD card into the new unit. **Attention, the data available on this map will be irreversibly deleted.
The image of a blank system, it is a system image available for your distribution in their official version. Download the image corresponding to your distribution and platform. And place it in the “/images” directory of the NFS file system. Ex: /nfs/boot/boot/rock64/images or /nfs/boot/rpi/images …
Give it a generic name by keeping the name of the distribution as well as its version (very important to historize the installed images). Always keep the installed images, this may allow you to assess the risks of a late detected “infection” in the future. This will allow you to reinstall the image and see the impact of this infection on your data center. **Never install “exotic” images only official images**.
Creating the image installation robot
Procedure :
- Detection of SD card availability
- Detection of the image to be installed. I always install the most recent image, discovered on the NFS file system.
- Writing the image to the SD card
- Writing control.
Detection of SD card availability
The Automata using a simple control system should detect the presence of an SD card in the device. SD cards are named “/dev/mmcblk[Numerator]” (ex: /dev/mmcblk0 or /dev/mmcblk1 etc… by the kernel. Some units start at 0 (Raspberry PI) or 1 (Rock64). Therefore I will search for both cases, and using the command “partprobe”, which will return code 0 for “found” or code 1 for “not found”:
Detection of the image to be installed
Images from official systems should be downloaded and compressed in zip format, then copied into the “images” folder of the NFS folder corresponding to the architecture of the unit started by the network. Ex: /nfs/boot/boot/rock64/images or /nfs/boot/rpi/images …
Write the image to the SD card
This function will decompress the disc image on the SD card. Use of unzip and dd commands in a pipeline.
Writing control
A check using the “partprobe” tool will detect the presence of partitions and their type. Preamble to the “chroot” that will be executed in the main partition to add the necessary packages, SSH keys, etc…
The Automata allowing the installation of images
This pseudo-script (Automata) should be executed by the command “mytinydc-automation.sh” (see the project on our GitLab)
The Automata is called “provisionserver” and is arranged as follows:
/opt/mytinydc/automates/provisionserver
|___> script.mtya

    # script.mtya
    #this function takes the prefix of SDCARD devices ex: /dev/mmc...
    function probesdcard {
             export SDCARDDEV=""
             # Probing if media ok
             DEVICENUMS="0 1 2 2"
             for num in $DEVICENUMS;do
                     /sbin/partprobe -d -s $1$num >/dev/null 2>/dev/null #DONTCATCH
                     ERR=$$?
                     if [ "$ERR" = "0" ];then
                         SDCARDDEV=$1$num
                         break;
                     fi
             done
             if [ "$SDCARDDEV" ="" ];then
                     echo"[ERR] - The SD card is not found"
                     # end we can't go any further
                     exit 1
             fi
             echo"[*] SD card detected: $SDCARDDEV"
    } #DONTCATATCH
    #This function takes the path with the images
    #Absolute path with respect to the mounted NFS file system ex: /images
    function setimage {
        IMAGE=""
        if [ "$1" ="" ];then
            echo "You must specify the value of the image path as a parameter"
            exit 1
        else
            #Sorted on "most recent"
            CDIR=`they -t $1/*.zip` #DONTCATCH
            if [ "$CDIR" ="" ];then
                echo "The $1 image directory is empty"
                exit 1
            fi
            for file in $CDIR
            do
                if [ -f $file ];then
                    IMAGE=$file
                    station wagon
                fi
                done
         fi
         echo"[*] Detected image: $IMAGE"
         IMAGE export
    } #DONTCATATCH
    # Function to write the image to the SD card, irreversible operation
    # Takes in parameters: Full path of the image, destination
    copyImage function {
        echo"[*] Writing the image $1 to $2"
        # We're gonna need unzip
        apt-cache show unzip > /dev/null 2>/dev/null #DONTCATCH
        if [ "$?" = "1" ];then
            apt-get - install unzip on it
        fi
        BS="bs=1M"
        # dd displays the progress and report on STDERR redirect to STDOUT
        unzip -p $1 |dd of=$2 $BS status=progress 2>&1
        echo"[*] The copy went well: OK"
        echo"[*] Refresh partition table"
        /sbin/partprobe $2
    } #DONTCATATCH
    # Function to detect the system partition of the SD card
    # Parameter: device SDCARD
    function getsystempartition {
            export PARTITION=`fdisk -l $1 | grep " 83" | awk "{print $1;exit}'`
            if [ "$PARTITION" ="" ];then
                    echo"[ERR] The system partition installed on the SD card was not found (partition type 83)"
                    exit 1
            fi
    }
    # SDCARD mounting function
    # Parameters: device - mounting point
    function mountSdcard {
        mount|grep $1 #DONTCATCH
        if [ "$?" = "1" ];then
            echo"[*] Mounting $1 on $2"
            mount $1 $2 $2
        fi
        echo"[*] $1 Mounted on $2"
    }
    # SDCARD disassembly function
    # Parameter: device
    umountSdcard function {
        echo"[*] Unmounting $1"
        umount $1
        echo"[*] $1 Unmounted"
    }
    # Preparation of the chroot kit
    chrootkitmount function {
    # Mount necessary for chroot
    for fs in $1;do
        echo"[*] chroot editing $DEVICECHROOT on $2/$fs"
        mount --bind /$fs $2/$fs >/dev/null 2>/dev/null #DONTCATCH
    done
    }
    # Disassembling the chroot kit
    chrootkitumount function {
    # Mount necessary for chroot
    for fs in $1;do
        echo"[*] chroot disassembly $2/$fs"
        umount $2/$fs >/dev/null 2>/dev/null #DONTCATATCH
    done
    }


    # Mandatory variable
    #CHECK WRITETOSDCARD
    probesdcard "/dev/mmcblk"
    setimage "/images"
    if [[[ "$WRITETOSDCARD" = "Y" ]];then
        copyImage $IMAGE $SDCARDDEV
    fi
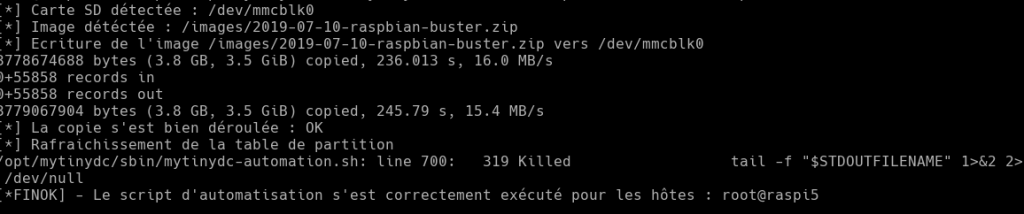
Automata execution
At this stage the server is started by the network and accessible via SSH. From the Automata server, run:
/opt/mytinydc/sbin/mytinydc-automation.sh provisionserveur raspi5 WRITETOSDCARD="Y"
**raspi5 in my example is the DNS name of the server started by the network
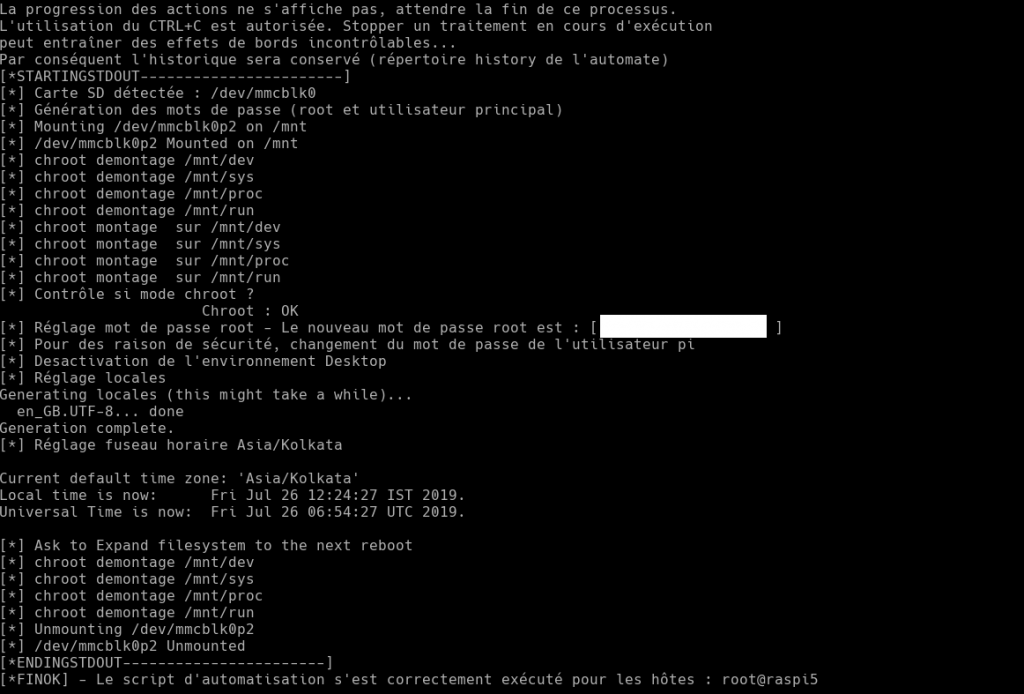
Setting up the new server
We will move on to the basic settings of the server.
This operation will be performed in a “chroot”. To accomplish this operation we will need a shell that will include the operations to be performed, to which I will pass the necessary parameters:
- HOSTNAME (host name of the server),
- PASSWORDROOT (root password),
- PASSWORDMAINUSER (main user password “pi”),
- TIMEZONE (time zone zone),
- LOCAL (definition of local “en fr etc…”,
- LOCALEENCODE (default encoding “iso8859, etc”).
I will write a second Automata to execute the entire procedure.
The procedure consists of changing the host name of the final server, assigning a “root” password, and a password to the main user (depends on the distributions).
For Raspberry PI and Raspbian distribution, the user “pi” is created implicitly.
Then we will move on to the configuration of the production time zone of the server and its “locales”.
I also install the SSH public keys of the servers with authority (e.g. backup server).
These will be placed in the “resources/sshkeys” directory of the Automata.
The Automata is called “setupserver” and is arranged as follows:
/opt/mytinydc/automates/setupserver
|___> script.mtya
|___> Resources
|________> actionschrooted.sh
|________________________> sshkeys
|________________________> sshkeybackuppc
Resource file
This is the shell that will be executed in chroot mode.
The Automata must send this file to the final server so that the shell executed via SSH by the Automata can reach it and execute it in the environment of the new server.
This file is to be placed in the “resources” directory of the Automata.
File: “resources/actionschrooted.sh”
    #!/bin/bash
    # @author DHENRY (@MytinyDC.com)
    # @CC BY-NC-ND 4.0 license
    # Project (c)MytinyDC.com

    #executed in chroot approximately
    if [ "$1" ="" ];then
        echo"[ERR] Please provide the hostname (ex: raspi14)"
        exit 1
    fi
    if [ "$2" ="" ];then
        echo"[ERR] Please provide the root password"
        exit 1
    fi
    if [ "$3" ="" ];then
        echo"[ERR] Please provide the primary user password (user pi)"
        exit 1
    fi

    echo"[*] Control if chroot mode?"
    RES=$(ls -di /)
    if [ "$RES" = "2 /" ]
    then then
        echo "Chroot : OK"
    else
            echo"[ERR] You must be in a chrooted environment to continue"
            exit 1
    fi

    HOSTNAME=$1
    PASSWORDROOT=$2
    PASSWORDMAINUSER=$3
    TIMEZONE=$4
    LOCAL=$5
    LOCALEENCODE=$6
    # Set hostname
    echo $HOSTNAME > /etc/hostname
    # set root password to new install
    echo"[*] Root password setting - The new root password is: [ $PASSWORDROOT ]"
    (echo root:$PASSWORDROOT | chpasswd)
    #For pi only
    PI=$(getent passwd pi)
    if [ "$PI" !=""" ];then
            echo"[*] For security reasons, change the password of user pi"
            $(echo pi:$PASSWORDMAINUSER| chpasswd)
    fi
    ############
    # Disable nodm on rock64 - no problem with pi command will just answer an error
    echo"[*] Desactivation of the Desktop environment"
    systemctl disable nodm >/dev/zero 2>&1

    #source: https://serverfault.com/questions/362903/how-do-you-set-a-locale-non-interactively-on-debian-ubuntu/689947#689947
    echo"[*] Local setting"
    sed -i -e -e's/# $LOCALE $LOCALEENCODE/$LOCALE $LOCALEENCODE/' /etc/locale.gen
    echo "LANG="$LOCALE"'>/etc/default/local
    dpkg-reconfigure --frontend=non-interactive local 2>&1
    update-local LANG=$LOCAL

    ############
    #TIMEZONE is set in config.sh
    #source : https://stackoverflow.com/questions/8671308/non-interactive-method-for-dpkg-reconfigure-tzdata#8671492
    echo"[*] Time zone setting $TIMEZONE"
    # unlink
    rm /etc/timezone >/dev/null 2>&1
    ln -fs /usr/share/zoneinfo/$TIMEZONE /etc/localtime
    dpkg-reconfigure -f non-interactive tzdata 2>&1

    ############
    # Expand filesystem to the entire disk Raspberry - Automatically done on Rock64 with armbian distro
    if [ -f "/usr/bin/raspi-config" ];then
        echo"[*] Ask to Expand filesystem to the next reboot"
        raspi-config --expand-rootfs > /dev/null 2>&1
        if [ "$?" != "0" ];then
            echo"[ERR] The FS root expansion request was not successful"
            echo " to the next reboot run, connected root:"
            echo "raspi-config --expand-rootfs"
            echo "reboot"
        fi
    fi
    #### activate SSH (Buster)
    echo"[*] Activation ssh"
    systemctl enable ssh

    ## Allow root connection via ssh (uncomment both lines if you don't use public keys otherwise you can't connect after installation)
    #echo"[*] Allow root connections"
    #sed -i "s/#PermitRootLogin prohibit-password/PermitRootLogin yes/" /etc/ssh/ssh/sshd_config
    # Autologous deactivation
    echo"[*] Autologous desactivation on PI"
    sed -i -E "s/(^ExecStart=.*autolo.*)/ExecStart=-\/sbin\/agetty --noclear %I xterm-256color/" /etc/systemd/system/getty@tty1.service.d/autologin.conf 2>&1
Parameter setting Automata
This script presents many commands without error interception (#DONTCATCH). This is a technical choice, errors will systematically appear in the report, it is important to go all the way to the end to allow you to replay this same script in case of errors. The sequence is complex to intercept errors and go back.
# script.mtya
#this function takes the prefix of SDCARD devices ex: /dev/mmc...
function probesdcard {
    export SDCARDDEV=""
    # Probing if media ok
    DEVICENUMS="0 1 2 2"
    for num in $DEVICENUMS;do
            /sbin/partprobe -d -s $1$num >/dev/null 2>/dev/null #DONTCATCH
            ERR=$$?
            if [ "$ERR" = "0" ];then
                SDCARDDEV=$1$num
                break;
            fi
    done
    if [ "$SDCARDDEV" ="" ];then
            echo"[ERR] - The SD card is not found"
            # end we can't go any further
            exit 1
    fi
    echo"[*] SD card detected: $SDCARDDEV"
}
# Function to detect the system partition of the SD card
# Parameter: device SDCARD
function getsystempartition {
        export PARTITION=`fdisk -l $1 | grep " 83" | awk "{print $1;exit}'`
        if [ "$PARTITION" ="" ];then
                echo"[ERR] The system partition installed on the SD card was not found (partition type 83)"
                exit 1
        fi
}
# SDCARD mounting function
# Parameters: device - mounting point
function mountSdcard {
    mount|grep $1 #DONTCATCH
    if [ "$?" = "1" ];then
        echo"[*] Mounting $1 on $2"
        mount $1 $2 $2
    fi
    echo"[*] $1 Mounted on $2"
}
# SDCARD disassembly function
# Parameter: device
umountSdcard function {
    echo"[*] Unmounting $1"
    umount $1
    echo"[*] $1 Unmounted"
}
# Preparation of the chroot kit
chrootkitmount function {
# Mount necessary for chroot
for fs in $1;do
    echo"[*] chroot editing $DEVICECHROOT on $2/$fs"
    mount --bind /$fs $2/$fs >/dev/null 2>/dev/null #DONTCATCH
done
}
# Disassembling the chroot kit
chrootkitumount function {
# Mount necessary for chroot
for fs in $1;do
    echo"[*] chroot disassembly $2/$fs"
    umount $2/$fs >/dev/null 2>/dev/null #DONTCATATCH
done
}
# Generation with apg of two passwords
function genpassword {
    if [ ! -f "/usr/bin/apg" ];then
            echo"[*] Installation of the DEBIAN package: apt - random password generator"
            apt-get -y install apg > /dev/null 2>/dev/null
    fi
    # Get apg password root and mainuser (pi)
    echo"[*] Password generation (root and main user)"
    export PASSWORDROOT=$(apg -n 1 -m 15 -x 18)
    export PASSWORDMAINUSER=$(apg -n 1 -m 15 -x 18)
}
# Mandatory variables
#CHECK HOSTNAME
#CHECK TIMEZONE
#Example: TIMEZONE="Asia/Kolkata"
#CHECK LOCALE
#Example: LOCAL="en_GB.UTF-8"
#CHECK LOCALENCODE
#Example: LOCALEENCODE="UTF-8"

#RESS actionschrooted.sh /tmp/actionschrooted.sh
#RESS sshkeys/sshkeybackuppc /tmp/sshkeybackuppc
EXECCHROOT="/tmp/actionschrooted.sh"
probesdcard "/dev/mmcblk"
getsystempartition "$SDCARDDEV"
genpassword #DONTCATCH
MOUNTPOINT="/mnt"
DEVICESCHROOT="dev sys proc run"
mountSdcard "$PARTITION" "$MOUNTPOINT" #DONTCATCH
chrootkitumount "$DEVICESCHROOT" "$MOUNTPOINT" #DONTCATCH
cp "$EXECCHROOT" "$MOUNTPOINT/$EXECCHROOT" #DONTCATCH
chrootkitmount "$DEVICESCHROOT" "$MOUNTPOINT" #DONTCATCH
chroot $MOUNTPOINT/. /bin/bash -c "/bin/bash \"$EXECCHROOT\" \"$HOSTNAME\" \"$PASSWORDROOT\" \"$PASSWORDMAINUSER\" \"$TIMEZONE\" \"$LOCALE\" \"$LOCALEENCODE\" #DONTCATCH
chrootkitumount "$DEVICESCHROOT" "$MOUNTPOINT" #DONTCATCH
rm "$EXECCHROOT" #DONTCATCH
rm "$MOUNTPOINT/$EXECCHROOT" #DONTCATCH
#### Installation of ssh keys on root
mdkir -p $MOUNTPOINT/root/.ssh >/dev/null 2>&1 #DONTCATCH
AUTHKEYS="$MOUNTPOINT/root/.ssh/autorized_keys"
cat /tmp/sshkeybackuppc > $AUTHKEYS
umountSdcard "$PARTITION" #DONTCATCH
## Ready for reboot
The server is now ready to be rebooted for a standalone boot on its SD card. If you run a series of Automatons, it takes less than 4 minutes. You still need to install the necessary applications to integrate it into the Datacenter. This operation will be carried out by robots. The “root” access password is provided in the installation report, ** I recommend changing it at the first login**.
Restart
After restarting the server will be reachable by its ip or host name with the “root” account or from the units having authority on this server (in the above case, only the backup server has authority), via SSH key exchange.
Go further
This demonstration presents the practical aspects of automation, based on a concrete case study. Distributions are delivered with packages that are not needed for your use, such as the graphical user interface. To uninstall the graphical set: apt-get -y remove x11-common; apt-get -y autoremove. This command uninstalls everything about the graphical interface, its dependencies and the software that depends on this package. You can create several Automatons allowing the automated installation of services necessary for production….
Document licence : Creative Commons (CC BY-NC-ND 4.0)
THIS DOCUMENTATION IS PROVIDED "AS IS", WITHOUT WARRANTY OF ANY KIND AND DISTRIBUTED FOR EDUCATIONAL PURPOSES ONLY. THE AUTHOR, CONTRIBUTORS TO THIS DOCUMENTATION OR ©MYTINYDC.COM SHALL IN NO EVENT BE LIABLE FOR ANY DIRECT OR INDIRECT DAMAGE THAT MAY RESULT FROM THE APPLICATION OF THE PROCEDURES IMPLEMENTED IN THIS DOCUMENTATION, OR FROM THE INCORRECT INTERPRETATION OF THIS DOCUMENT.