
(**) Translated with www.DeepL.com/Translator
This article will allow you to install a Raspberry PI server to filter DNS (Domain Name Service) calls from all devices connected to your network. The PI-HOLE service consists of a list of domains and servers known to host online advertising. PI-HOLe becomes in fact the DNS server of the network. If one of your devices requests to present a site known to distribute advertising, the DNS call does not succeed, the device cannot, therefore, present the advertising. The system is very efficient, visually on the one hand, and also allows a significant saving in bandwidth usage.
This service is a countermeasure to this type of imposed technology:
https://www.bfmtv.com/tech/certaines-tv-sony-affichent-desormais-des-publicites-sur-leur-page-d-accueil-1668573.html
Prerequisites
- Raspberry PI (version 2 here)
- Raspbian distribution installed on an SD card - version used in this ticket: Stretch lite 2018-11-11-13 Download the latest version of Raspbian - Tool used to copy the image : [Etcher]
- A functional network connection
- The Raspberry must have a fixed IP address
Installation
Beforehand, install the Raspbian Stretch lite system on a Raspberry PI 2.
I used the Stretch lite version 2018-11-13 Download the latest version of Raspbian
Extraction of the image on a 16 go Sandisk class10 micro-sd card with [Etcher]
After starting the Raspberry, a turn in the settings is required, using the following command:
sudo raspi-config
Change the user password, change the keyboard to FR, resize the partition and allow ssh.
Then, update the system using the following commands:
sudo apt update
sudo apt upgrade
**Other requirements: go to your internet router configuration and assign a fixed IP to your new “Pi-hole server “ if you use DHCP functionality on your local network.
Restart the Raspberry to take into account the new IP address, or if you are connected directly to the pi:
ifdown[network interface name (eth0)]
ifup[network interface name (eth0)]
To know the name of the network interfaces of your Raspberry, use the command :
ip link
Example of a result obtained
1: lo: <LOOPBACK,UP,LOWER_UP> mtu 65536 qdisc noqueue state UNKNOWN mode DEFAULT group default qlen 1
    link/loopback 00:00:00:00:00:00:00:00:00 brd 00:00:00:00:00:00:00
2: enp0s3: <BROADCAST,MULTICAST,UP,LOWER_UP> mtu 1500 qdisc pfifo_fast state UP mode DEFAULT group default qlen 1000
    link/ether xx:xx:xx:xx:xx:xx:xx:xx brd ff:ff:ff:ff:ff:ff:ff
In this case the network interface connected to the local network is “enp0s3”
Installation of Pi-Hole
Consult this page, which indicates the different installation methods: Pi-Hole installation
Method chosen
sudo curl -ssl https://install.pi-hole.net | bash
Following the different steps proposed, the choice of the DNS server was made on : “OPENDNS”
At the end of the installation, note the necessary information that appears, and especially the password to connect to the Web console.
**Memo…………………………………………………………………………………………………: The installation trace file is located in: /etc/pihole/install.log
DNS configuration
First of all, you must configure the router to use Pi-Hole as an EXCLUSIVE DNS server!
Here you will find some examples of changes. The modifications to be made are related to the specifications of your router DNS configuration
Example of a router setup
The main router on the network is told that the DNS server is the address of your PI-HOLE server (important)
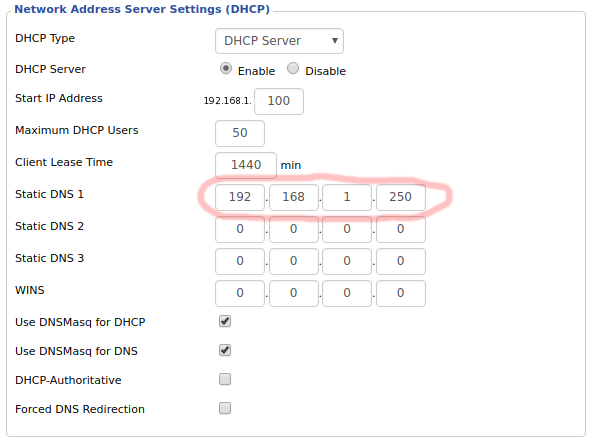
**IMPORTANT: Your new Pi-hole server must be the only DNS server in your network configuration.
Access to the web administration console
To access the administration web interface: http://pi.hole/admin or http://192.168.0.3/admin
Use the password provided when installing “Pi-Hole”.
Change of PI-Hole access password
Connected to the PI-Hole server console use the command :
sudo pihole -a -p
Test with a Windows 10
Change the settings of the PC network card:
Change the DNS address in:
- Control Panel
- Network and Internet
- Network connections
- right-click and select the “property” menu of your local network connection.
Select “Internet protocol version 4” and click on “properties”. Change the value of “Preferred DNS server” to the IP address of the PI-Hole server (in my case 192.168.0.3)
Note that the PI-HOLE administration interface allows the activation and deactivation of this service.
Select a web page loaded with ads, and consult it, by activating Pi-Hole and then deactivating Pi-Hole.
Update of Pi-Hole
To update Pi-Hole, connect to the PI-Hole server console, and type the following command:
pihole -up
Wait until the end of the program execution, your Pi-Hole is up to date:)
Document licence : Creative Commons (CC BY-NC-ND 4.0)
THIS DOCUMENTATION IS PROVIDED "AS IS", WITHOUT WARRANTY OF ANY KIND AND DISTRIBUTED FOR EDUCATIONAL PURPOSES ONLY. THE AUTHOR, CONTRIBUTORS TO THIS DOCUMENTATION OR ©MYTINYDC.COM SHALL IN NO EVENT BE LIABLE FOR ANY DIRECT OR INDIRECT DAMAGE THAT MAY RESULT FROM THE APPLICATION OF THE PROCEDURES IMPLEMENTED IN THIS DOCUMENTATION, OR FROM THE INCORRECT INTERPRETATION OF THIS DOCUMENT.