
(**) Translated with www.DeepL.com/Translator
I will talk about email transmission in the Datacenter. To explain the flows nothing better than a small drawing:
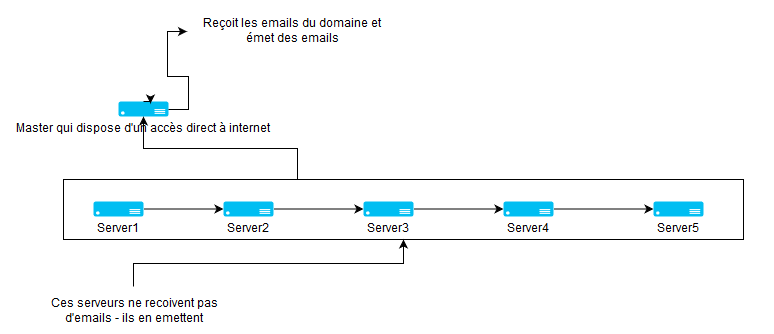
I have 6 servers, only one of which (Master) is connected to the Internet, which receives and sends emails for the domain. The other 5 do not have direct access to the Internet and send but do not receive emails. From the beginning a server that has a scheduled task (job cron), runs its process to the “standard” and “error” outputs. If you do not take care to redirect these outputs to a file, they will be redirected to the email of the account used to perform the task. Default servers are not equipped to send emails and will remain in a queue located in the “/var/spool/mail/mail/mail” file. To equip the server I install the MTA (Mail transfer agent) “exim4”. Many administrators use Postfix, make your choice…
In short, I have 6 servers that launch administration tasks, which can themselves generate errors. Assuming that I have installed an MTA on each of them, it is inconceivable to go and scan each server. All scheduled tasks are usually performed by the root user. In this case I will configure each of the servers in order to redirect all emails to the root user to a single address of the “Master” server. If you create scheduled tasks that are performed by a user other than root, you must redirect emails from this account to root, which will redirect to the unique address of the Datacenter. It is a redistribution chain. This is done by setting the file /etc/aliases
Installation of the main server (Master)
The Master server, distributes and receives domain emails and becomes the main relay for the Datacenter. The Datacenter’s I/O firewall only allows the Master server to pass through for email distribution.
MTA Installation - exim4
Installing the package: apt install exim4
Network specifications :
- Domain: “mtdc**”
- Internal Datacenter Network: 172.28.0.0/24 (255.255.255.0)
- Listening address of the email server (exim4) : 127.0.0.1 172.28.0.1
- Name of the email server: master and qualified: master.mtdc
I replace the content of the file “/etc/exim4/update-exim4.conf.conf.conf” with : (adapt the values to your configuration)
dc_eximconfig_configtype='internet' dc_eximconfig
dc_other_hostnames='master;master.mtdc''
dc_local_interfaces='127.0.0.0.1 ;172.28.0.1''
dc_readhost='''
dc_relay_domains='mtdc''.
dc_minimaldns='false'.
dc_relay_nets='172.28.0.0.0/24''
dc_smarthost='''
CFILEMODE='644''
dc_use_split_config='false'.
dc_hide_mailname='''
dc_mailname_in_oh='true'
dc_localdelivery='maildir_home''.
The configuration parameters for exim4 are set, I create the final configuration of the exim4 service by executing the command : update-exim4.conf, I restart the exim4 service by executing the command : service exim4 restart.
**At this point don’t even try to send an email to the internet with Master, it won’t work. ** This case will be the subject of another article.
Creating an email account
The purpose of this article remains to retrieve emails from secondary servers. To send an email, you must have a sender address and a recipient address. So I will create an account on the “master” server, called “outsourcing”. Use the command : *adduser infogerance **and fill in the necessary information, get into the habit of using strong passwords. To generate strong passwords, I use the apg software (apt install apg). The destination address for this account will be: infogerance@master.mtdc
Installation of a secondary server (ex: server1)
Secondary servers send but do not receive emails. The sending of emails will not pass the “master” relay. Secondary servers do not directly distribute emails off and in the network.
MTA Installation - exim4
apt install exim4
Network specifications :
- Domain: “mtdc**” * Name of the secondary server: **server1 **and qualified: server1.mtdc
- Name of the qualified email server: master.mtdc
I replace the content of “/etc/exim4/update-exim4.conf.conf.conf” with : (adapt the values to your configuration)
dc_eximconfig_configtype='satellite'.
dc_other_hostnames='**server1;server1.mtdc**''
dc_local_interfaces='127.0.0.0.1''
dc_readhost=****'server1.mtdc**''.
dc_relay_domains='''
dc_minimaldns='false'.
dc_relay_nets='''
dc_smarthost='**master.mtdc**''
CFILEMODE='644''
dc_use_split_config='false'.
dc_hide_mailname='true'
dc_mailname_in_oh='true'
dc_localdelivery='maildir_home"
The configuration parameters for exim4 are set, I create the final configuration of the exim4 service by executing the command :
update-exim4.conf
I restart the exim4 service by executing the command:
exim4 service restart
Test sending an email
Connected “root” to the server1 console, execute the command :
tail -f /var/log/exim4/exim4/mainlog &
This command allows the content of the trace file /var/log/exim4/mainlog to be displayed continuously and in the background.
Send an email using the command:
echo "test mail." | sendmail infogerance@master.mtdc
The console displays a message indicating that the email has been delivered by “server1” (Completed)
2018-11-15 10:19:05 1gN9aT-0003Hd-SS <= root@server1 U=root P=local S=274root@server1:~# 2018-11-15 10:19:06 1gN9aT-0003Hd-SS => infogerance@master.mtdc R=smarthost T=remote_smtp_smarthost H=master.mtdc[172.28.0.1] C="250 OK id=1gN9aU-0001qf-6R
2018-11-15 10:19:06 1gN9aT-0003Hd-SS **Completed**
Type the command :
fg
#then** CTRL-C**
This stops the continuous playback process of the trace file.
Now connect to the “Master” server with the root user, and type the command :
ls /home/infogerance/Maildir/new/
You have a. Read the contents of this file with the command :
cat /home/info/Maildir/new/[file name]
You get this type of content, including the sentence “test mail.”
Return-path: root@server1.mtdc
Envelope-to: infogerance@master.mtdc
Delivery-date: Thu, 15 Nov 2018 10:27:08 +0530
Received: from server1.mtdc ([172.28.0.4] helo=server1)
       by masterwith esmtp (Exim 4.89)
       (envelope-from root@server1.mtdc)
       id 1gN9iF-00020x-GA
       for infogerance@master.mtdc; Thu, 15 Nov 2018 10:27:07 +0530
Received: from root by server1 with local (Exim 4.89)
       (envelope-from)
       id 1gN9iF-0003Ni-61
       for infogerance@master.mtdc; Thu, 15 Nov 2018 10:27:07 +0530
Message-Id:
From: root root@server1.mtdc
Date: Thu, 15 Nov 2018 10:27:07 +0530


mail test.
Setting up email aliases
I would like all emails for root on this server (server1) to be sent to infogerance@master.mtdc. I add an entry to the file /etc/aliases as follows:
root: infogerance@_master_.mtdc
**Repeat this installation operation on the other 4 servers.
Reading emails
You’re going to tell me, it’s great your thing but I’m not going to execute a cat command on each email received, then the rm command to delete them…
Indeed, it is unmanageable, so we will use a “Webmail” type system. One of the best known is certainly Roundcube. And it’s from here that it gets complicated.
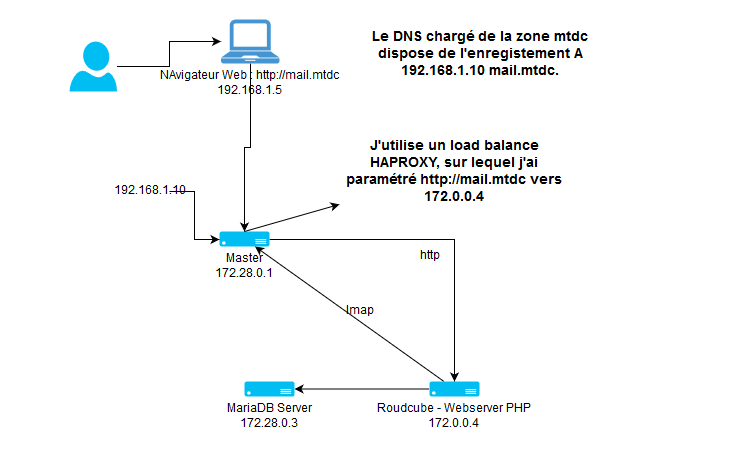
Debian has the roundcube package, which requires a MariaDB (Mysql clone) or Postgresql database. My Datacenter has a MariaDB database server, so I will use it to store RoundCube information. To read an account’s emails, RoundCube uses the IMAP technology. To implement this technology I choose Dovecot which will be installed on the “Master” mail server. A small drawing to detail the topology:
Dovecot installation
I had to mix all the information found on the Internet and I tested the connections/readings with the “Thunderbird” application (IMAP account type)….
Let’s go, everything that follows seems complex but they are only modifications to be made in the Dovecot configuration files.
apt-get install dovecot-imapd

# modify the file /etc/dovecot/conf.d/10-mail.conf
#look for the line beginning with "mail_location"
#Comment this active line by prefixing it with #
and add the line :
mail_location = maildir:~/Maildir
Generate SSL certificates to establish a secure TLS connection
openssl req -x509 -nodes -days 3650 -newkey rsa:4096 -out /etc/ssl/certs/mailcert.pem
-keyout /etc/ssl/private/mail.key

Country code: FR
Status: xxx
City: xxx
Organization: xxxx

**FQDN : **the qualified name of the mail server : **indicate the qualified name that will be called by roundcube**.
The latter carries out checks (DNS, qualified name, etc...)

#Modify the file /etc/dovecot/conf.d/10-ssl.conf** as follows
ssl = required
ssl_cert = </etc/ssl/certs/mailcert.pem
ssl_key = </etc/ssl/ssl/private/mail.key


#Modify the file /etc/dovecot/conf.d/10-master.conf** as follows
service imap-login {
inet_listener imap {
  #port = 143
}
inet_listener imaps {
 port = 993
 ssl = yes
}
service auth {
...
# Auth process is run as this user.
user = $default_internal_user

# Modify the file /etc/dovecot/conf.d/10-auth.conf**
# uncomment the line **_disable_plaintext_auth = yes_**
# and modify the auth_mechanisms line as follows
auth_mechanisms = plain login

# Modify the file /etc/dovecot/dovecot/dovecot.conf**
# modify the listen line
listen = 172.28.0.1, 192.168.1.1.10

# The address 192.168.1.1.10 is the address by which I can contact the Master server from outside the Datacenter. For
# perform the tests with Thunderbird, I have a Linux PC with a graphical interface, which is located outside the
# Datacenter.

# Restart Dovecot:
service dovecot restart
**Firewall: then open port 993 on the interfaces corresponding to the IP addresses indicated on the “listen” line of the file /etc/dovecot/dovecot.conf
To perform the test with Thunderbird, specify the parameters of your environment and the authentication method “normal password”.
RoundCube installation
If the test with Thunderbird does not work, there is no need to go any further….
For RoundCube and using the Debian package, the installation was in the same lineage, especially since the MariaDB database is located on a different server than the one where RoundCube is installed.
Connection to the Web server that already has PHP, I run the command:
apt install roundcube
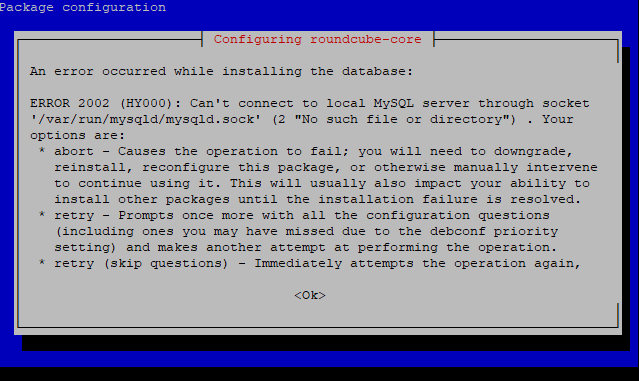
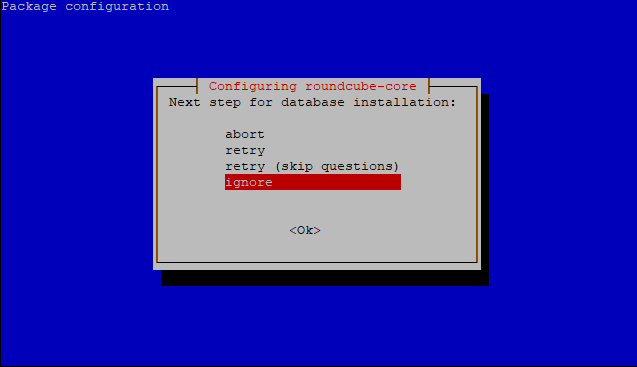
Select “ignore” to complete the installation
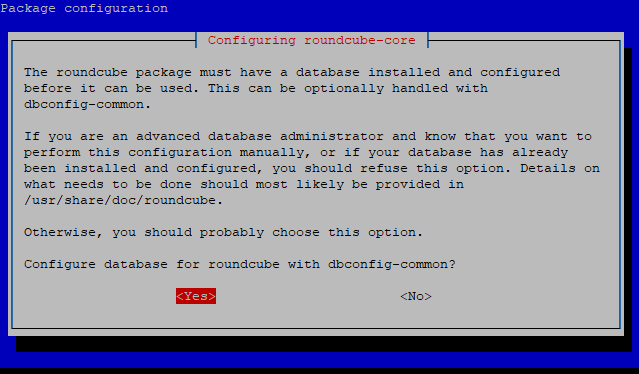
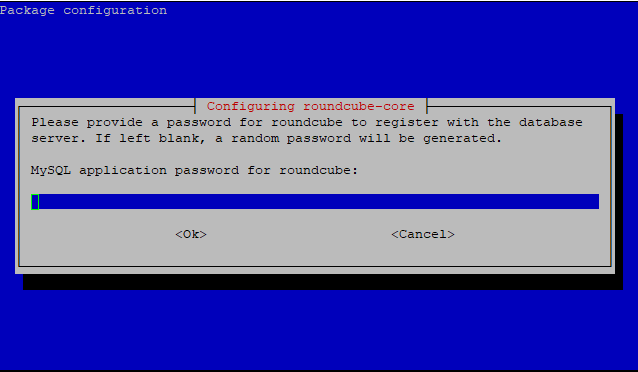
The installer asks me for the password for access to the roundcube database, and the root password of the MariaDB server. But he doesn’t ask me for the server address. The installation is done for a configuration with MariaDB server locally. The new Roundcube database and its schematics are therefore not installed…
Creation of the MariaDB database
I create a database on the server “172.28.0.3”. You can use phpmyadmin if you have this tool connected to the MariaDB base server, or you can create it manually by connecting to the MariaDB server console. The creation command is:
#Connected root to the MariaDB server console, execute the command :
mysql

# then type the following mysql commands

CREATE DATABASE roundcube;GRANT ALL PRIVILEGES ON roundcube.* TO **username**@localhost IDENTIFIED BY'**password**';
`FLUSH PRIVILEGES;`
# where username is the login to the database and password is the password used for the MariaDB authentication that you need to replace.
But I still don’t have the schematics! Looking at the contents of the Debian RoundCube package, I see that the installation schema is located in the file “/usr/share/dbconfig-common/data/roundcube/install/mysql**”. The latter contains the entire SQL script to initialize the RoundCube database. This diagram is also available at (https://github.com/roundcube/roundcubemail/blob/release-1.2/SQL/mysql.initial.sql). I retrieve its content, connect to the database via Phpmyadmin, paste the entire SQL code and execute it. If you are using the command line, copy this file to the database server, and run the command: _ mysql -u[username] -p[database name] <[sql file name]_. The command will ask you for the password to access the roundcube database.
RoundCube settings
I’m looking for the configuration of the RoundCube database which is located in the file /var/lib/roundcube/config/debian-db.php (you must adapt the terms in bold)
$dbuser='**roundcube**';
$dbpass='**password**';
$basepath=''';
$dbname='**username**';
$dbserver='**172.28.0.0.3**';
$dbport='3306';
$dbtype='mysql';
RoundCube uses IMAP, I indicate the IMAP server address by modifying the file /var/lib/roundcube/config/config.inc.php
$config['default_host'] ='tls://master.mtdc';

# Default_host' must match the FQDN of the SSL certificate created in the "DOVECOT Installation" chapter.
# The master.mtdc host must be resolved by the Datacenter DNS.
and adding additional settings for SSL connection
$config['imap_conn_options'] = array(
"ssl" => array(
"verify_peer" => true,
allow_self_signed' => true,
)
);
VirtualHost Apache settings
On the server where RoundCube is installed, I add the virtualHost “**/etc/apache2/sites-available/mail.mtdc.conf **” simplistic to isolate errors for the qualified name “mail.mtdc” and configured as follows:
<VirtualHost _default_:80>>

   ServerName mail.mtdc

   ServerAdmin root@localhost

   ErrorLog ${APACHE_LOG_DIR}/errormail.log

</VirtualHost>
I’m activating this VHosts:
a2ensite mail.mtdc
And reload the apache configuration:
apache2 reload service
With my browser, I connect to the url: _http://mail.mtdc/roundcube _You will notice that Vhost does not have any configuration items related to the directories used by RoundCube. The Debian package already includes this configuration and is located in /etc/apache2/conf-available/roundcube.conf. We can have the alias “/roundcube”.
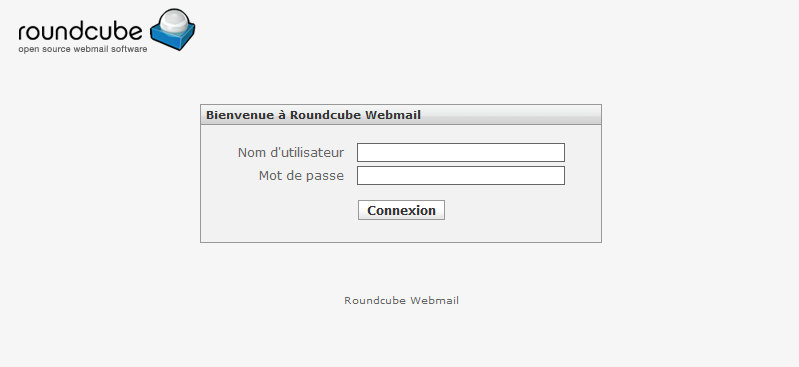
With which account do I need to log in? Simply the outsourcing account created on the “Master” server in the chapter “Test sending an email” and using the password you provided when it was created. Here is the connection process:
- Connection to the RoundCube url: http://mail.mtdc
- I provide the account/password: “outsourcing/my password”
- RoundCube is looking for the configuration of the IMAP server
- It sends the pair account/password previously entered
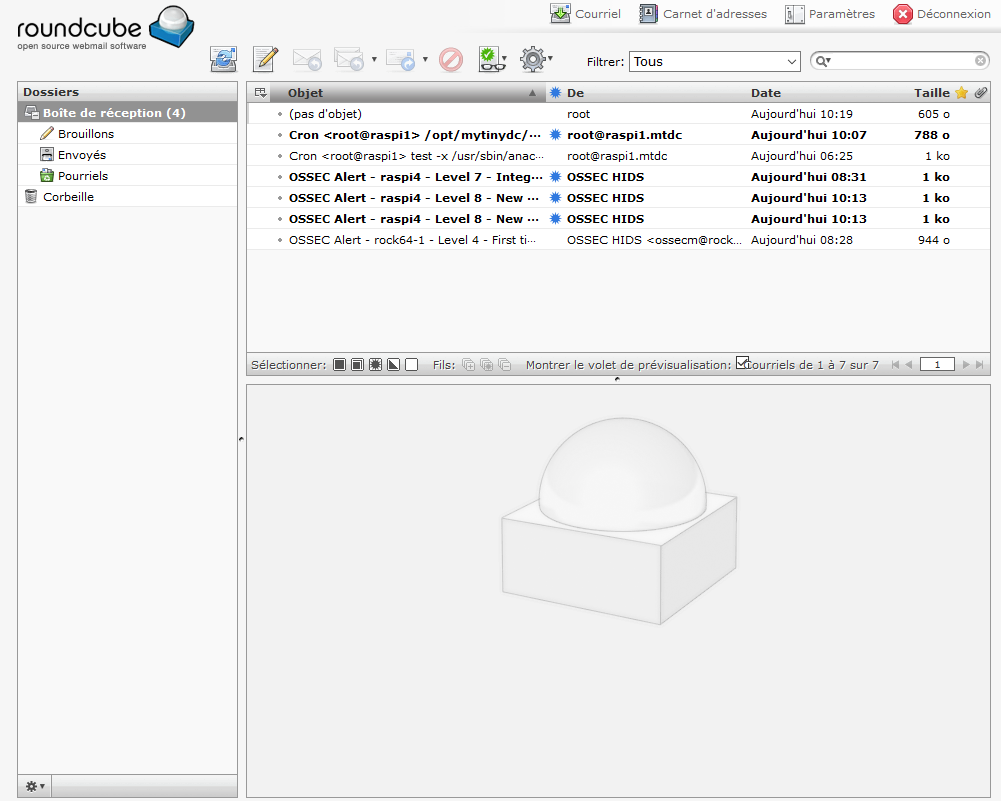
- If authentication is successful, RoundCube can retrieve emails from this account and present them in the interface.
Always the same, don’t try to send an email with RoundCube_ This will be the subject of another article.
Going further
- Install a secure connection between the user and RoundCube (HTTPS)
- Install a secure connection (TLS/SSL encrypted SMTP) between the servers and the mail server (in the configuration presented this is not the case using port 25 - unencrypted SMTP)
- Use accounts indicating the domain (e. g. infogerance@master.mtdc
- Set up the mail server to send messages over the Internet.
Document licence : Creative Commons (CC BY-NC-ND 4.0)
THIS DOCUMENTATION IS PROVIDED "AS IS", WITHOUT WARRANTY OF ANY KIND AND DISTRIBUTED FOR EDUCATIONAL PURPOSES ONLY. THE AUTHOR, CONTRIBUTORS TO THIS DOCUMENTATION OR ©MYTINYDC.COM SHALL IN NO EVENT BE LIABLE FOR ANY DIRECT OR INDIRECT DAMAGE THAT MAY RESULT FROM THE APPLICATION OF THE PROCEDURES IMPLEMENTED IN THIS DOCUMENTATION, OR FROM THE INCORRECT INTERPRETATION OF THIS DOCUMENT.