
(**) Translated with www.DeepL.com/Translator
Update of 23/05/2019 - Expose your Nextcloud service on the Internet, as part of a self-hosting. I refer you to this post: https://www.mytinydc.com/index.php/2019/05/23/nextcloud-exposez-votre-instance-sur-internet/
Still in the context of the decentralization of the web, it is interesting to have your own cloud storage solution.
NEXTCloud is the solution I chose.
This application has a large community, a browser version, a desktop version, mobile versions and a large ecosystem, including the federation. The federation allows you to communicate with other Nextcloud servers and thus facilitate document sharing.
Thanks to its vast eco-system, Nextcloud allows you to take control of your data, since it has an impressive number of functionalities that allow it to be stored:
- Replacing Google Keep: JOPLIN (Desktop and mobile): https://github.com/laurent22/joplin
- To replace the storage of contacts and calendars at Google: Caldav, CardDav (Mobile)
- As a replacement for Google Doc: No solution to be placed on a Lowtech unit. For the moment I use Onlyoffice, installed on a VM X86. https://nextcloud.com/onlyoffice/
- Integration of draw.io to create your diagrams (https://apps.nextcloud.com/apps/drawio).
In this post, I will explain how to install and configure Nextcloud, for PI3 and/or Rock64 Raspberry, on a local network (it also works for X86 and amd64 platforms).
Installation
The application is written in PHP, so small Raspberry units will “suffer”. I chose to have the service on a Rock64, faster, and with more memory. To further improve performance, I recommend that you host the Mysql/MariaDB database on a separate unit (a Raspberry PI 3 is sufficient).
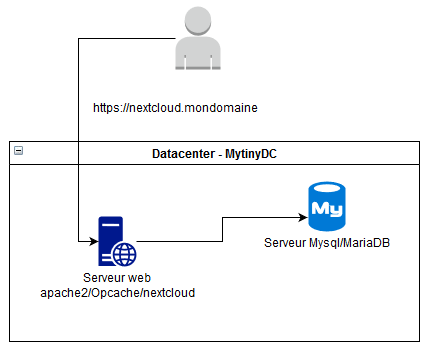 diagram made with draw.io integrated in Nextcloud
Preparation
Here I will list all the necessary configuration elements:
- IP address of the Nextcloud server[* ipservnextc] : 192.168.1.1.2
- Nextcloud application access administrator account[* adminnextc] : admin
- Password for the Nextcloud application access administrator account[* passadminnextc] : use the apg software to generate a random password (apt install apg; apg)
- IP address of the MariaDB/Mysql server[* ipservmysql] : 192.168.1.1.3
- Database name[* database] : nextcloud
- Database access account[* usermysql] : nextcloud
- Database access account password[* passmysq**l] : use the apg software to generate a random password (apt install apg; apg)
- Fqdn that will allow access to the nextcloud service[* fqndnextc] : nextcloud.mtdc - If you want to expose your Nextcloud on the internet, you must buy a domain name (type “buy a domain name” on DuckDuckGo)
**[*…] are the shortened names used, below.
Nextcloud Server
This service requires the installation of several Debian packages. Connect “root” to the Nextcloud server, and execute the following commands:
System update
apt update;apt -y upgrade
Installation of the necessary packages
- DEBIAN 9
apt install apache2 libapache2 libapache2-mod-php7.0 php7.0-cli php7.0-curl php7.0-curl php7.0-gd php7.0-opcache php7.0-zip php7.0-mbstring php7.0-mysql php-imagick unzip sudo openssl nmap
- DEBIAN 10
apt -y install apache2 libapache2-mod-php php-cli php-curl php-gd php-opcache php-xml php-zip php-zip php-mbstring php-mysql php-imagick unzip sudo openssl nmap php-pgsql php-intl php-apcu nmap
The files to download arehere, but we will directly download the latest version accessible by its name “latest”.
Go to the Nextcloud server console, and type :
cd /var/www/html/
wget https://download.nextcloud.com/server/releases/latest.zip
# Checksum MD5
wget https://download.nextcloud.com/server/releases/latest.zip.md5
Integrity check:
md5sum -c latest.zip.md5
# must return
latest.zip: OK
If the integrity check fails, repeat the download.
Now unzip the contents of the zip file “NextCloud”:
unzip latest.zip
Modify the permissions on the whole directory /var/www/html/nextcloud/ (allocation of access permissions for the www-data account) :
chown -R www-data:www-data:www-data /var/www/html/nextcloud/
Delete the downloaded archives:
rm *.zip *.md5
After performing these operations, the contents of the “/var/www/html/nextcloud/” directory should look like this:

Firewall
OUTPUT: 3306/TCP - Limited to address[* ipservmysql]
INPUT: 443/TCP - Accessible from anywhere
Database Server (MariaDB/Mysql)
Connect root to the database server, then run the following commands:
System update
apt update;apt -y upgrade
Installation of the necessary packages
This phase will ask you to provide the “root” password for access to the MariaDB/Mysql service, which you must keep.
apt install mariadb-server
Firewall
Get into the habit of limiting access to your database server.
INPUT: 3306/TCP - Limited to the ip address of[* ipservnextc]
Configuration
Database Server (MariaDB/Mysql)
Let’s create the account and database for the Nextcloud application, open a root console on the MariaDB/Mysql server, and then run the following commands:
Launch of the mysql shell, in which we will execute SQL statements.
Attention you will have to replace the shortcuts ([* * ….]) by the values retained during the preparation.
mysql

CREATE USER '[* usermysql]'@'%' IDENTIFIED BY '[* passmysql]';
CREATE DATABASE IF NOT EXISTS[* database] CHARACTER SET utf8mb4 COLLATE utf8mb4_general_ci;
GRANT ALL PRIVILEGES on[* database].* to '[* usermysql]'@'%';
FLUSH privileges;
exit
PS : If you have decided to install the MariaDB/Mysql service on the same machine as the Nextcloud application, replace “%” with “localhost” in SQL commands.
Nextcloud Server
Open a “root” console on the Nextcloud server, then execute the following commands:
Attention you will have to replace the shortcuts ([* * …]) by the values retained during the preparation.
Access test to port 3306 of the MariaDB/Mysql server
nmap -p 3306[* ipservmysql]
#You will have to get the line:
#3306/tcp open mysql

cd /var/www/html/nextcloud/
sudo -u www-data php occ maintenance:install --database "mysql" --database-host="[* ipservmysql]" --database-name"[* database]" --database-user"[* usermysql]" --database-pass"[* passmysql]" --admin-user"[* adminnextc]" --admin-pass

Nextcloud is not installed - only a limited number of commands are available

Nextcloud was successfully installed
Prepare access to Nextcloud
To perform this operation we will configure the web server (apache2), so that it redirects requests for access to the domain name to the application. The link will be with the HTTPS protocol, so we will need a certificate. Being in a local network, a self-signed certificate will suffice. We will need the variable[* fqdnnextc] retained during the preparation.
Creating the self-signed https certificate
Always connected “root” to the Nextcloud server console, the ssl certicates will be stored in the directory: “/etc/apache2/ssl/” let’s create this directory using the command :
mkdir /etc/apache2/ssl/
Then type these commands, pressing “Enter” after each line:
PARAMETER_CERT_C="FR"
PARAMETER_CERT_ST="private"
PARAMETER_CERT_L="France"
PARAMETER_CERT_O="Nantes"
CN=[* fqdnnextc]
PATHCERTS=/etc/apache2/ssl
Attention you will have to replace the shortcuts ([* * …]) by the values retained during the preparation.
on one line: **# on one line: **
openssl req -new -x509 -days 365 -nodes -subj "/C=$PARAMETER_CERT_CERT_C/ST=$PARAMETER_CERT_ST/L=$PARAMETER_CERT_L/O=$PARAMETER_CERT_O/CN=$CN" -out $PATHCERTS/$CN.
Two files have been created in the “/etc/apache2/ssl/” directories, whose names begin with[* fqdnnextc]. Check by typing the command:
They -l /etc/apache2/ssl/

Change the permissions of these files:
chmod 644 /etc/apache2/ssl/*.crt
chmod 600 /etc/apache2/ssl/*.key
Creating the VirtualHost Apache2
Always connected “root” to the Nextcloud server console, I create a virtualhost file, whose syntax is specific to the apache2 environment.
The virtualhost file ends with the extension".conf “
vi /etc/apache2/sites-available/[* fqdnnextc].conf
Add this content by adapting it, You will have to replace the shortcuts ([* * …]) by the values retained during the preparation.
<IfModule mod_ssl.c>
    <VirtualHost _default_:443>>
    <IfModule mod_headers.c>
      Header always set Strict-Transport-Security "max-age=15552000; includeSubDomains"
    </IfModule>

		       ServerName[* fqdnnextc]
                       ServerAdmin[* admin email]
                       RewriteEngine On
                       RewriteCond %{HTTPS} off
                       RewriteRule ^(.*)$ https://%{HTTP_HOST}$1[R=301,L]
  RewriteRule ^/\.well-known/host-meta /public.php?service=host-meta[QSA,L]
  RewriteRule ^/\.well-known/host-meta\.json /public.php?service=host-meta-json[QSA,L]
  RewriteRule ^/\.well-known/webfinger /public.php?service=webfinger[QSA,L]
  RewriteRule ^/\.well-known/carddav /remote.php/dav/[R=301,L]
  RewriteRule ^/\.well-known/caldav /remote.php/dav/[R=301,L]
                       DocumentRoot /var/www/html/nextcloud
                       ErrorLog ${APACHE_LOG_DIR}/error-[* fqdnnextc].log
                       #CustomLog ${APACHE_LOG_DIR}/access-[* fqdnnextc].log combined
                       CustomLog ${APACHE_LOG_DIR}/access-[* fqdnnextc].log forwardfor
                       SSLEngine on
                       SSLCertificateFile /etc/apache2/ssl/[* fqdnnextc].crt
                       SSLCertificateKeyFile /etc/apache2/ssl/[* fqdnnextc].key
                       <FilesMatch "\.(cgi|shtml|phtml|php)$">
                                       SSLOptions +StdEnvVars
                       </FilesMatch>
                       <Directory /usr/lib/cgi-bin>
                                       SSLOptions +StdEnvVars
                       </Directory>
                       <Directory />
                                FollowSymlinks options
                                       AllowOverride All
                                        Order allow,deny
                                        allow from all
                       </Directory>
<Directory /var/www/html/nextcloud/data>
Require all denied
</Directory>

</VirtualHost>
</IfModule>
Save and exit: ESC:wq
Apache2 configuration
SSL module activation for apache2
a2enmod ssl
Enabling Rewrite mode for apache2
a2enmod rewrite
Headers mode activation for apache2
a2enmod headers
Virtualhost activation
**You will have to replace the shortcuts ([*…]) with the values used in the preparation.
a2ensite[* fqdnnextc]
OPcache configuration
Opcache ( Optimizer Plus Cache) is a system for PHP, allowing to improve its performance. Sometimes this process does not work. To ensure that it works properly, follow this instruction:
Search on the unit, the location of the opcache library
find /usr -name'opcache.so''
[Response] : /usr/lib/php/20151012/opcache.so
vi /etc/php/7.0/mods-available/opcache.ini
configuration for php opcache module
; priority=10
zend_extension=[report the "Answer"]
Type to exit: ESC:wq!
DNS check
To join the Nextcloud service, you must make sure that the station you are working with (web browser), can access the Nextcloud server, by its qualified name ( FQDN - variable [ fqdnnextc]*)
Windows: open a console (cmd.exe), type :
nslookup[* fqdnnextc]
Linux: open a console, type:
host[* fqdnnextc]
These commands must return a valid response.
*You will have to replace the shortcuts ([ …]) by the values retained during the preparation. **
Starting the NextCloud service
To start the NextCloud service, it is associated with the apache2 configuration, execute the command :
systemctl start apache2
or (if apache2 is already started)
systemctl restart apache2
First access to Nextcloud
From your workstation, start your browser, then type the url: https://[* fqdnnextc]
As the certificate is self-signed, the browser will indicate that the certificate is not valid, confirm access.
You will have to replace the shortcuts ([* * …]) by the values retained during the preparation.
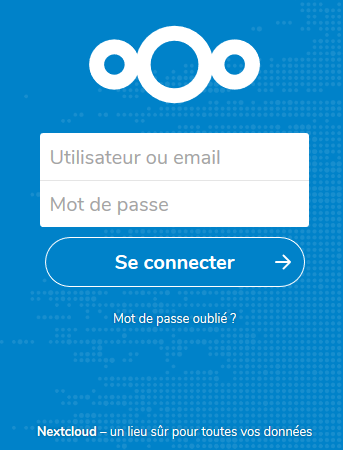
To access your “Cloud”, log in with the administrator account, values[* adminnextc] and[* passadminnextc], retained during preparation.
Setting up your NextCloud instance
First of all, I invite you to create the necessary users, never work with the “administrator” account and refer to the official documentation available on the NextCloud website: https://nextcloud.com/support/
The official documentation is in English, but you will find all the necessary resources in French by searching the Internet.
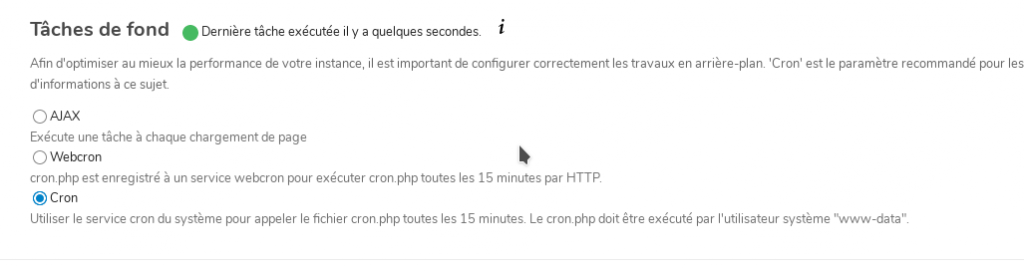
Scheduled tasks
Prefer, as indicated in the documentation, to execute the scheduled tasks using crontab. By default, this process is executed by each user via an XHR request, which reduces performance.
Create the file :
vi /etc/cron.d/nexcloud
and insert:
#Background spots
*/5 * * * * * www-data /usr/bin/php /var/www/html/nextcloud/cron.php**
The “cron.php” program will be executed every 5 minutes (recommended by Nextcloud) by the server.
Log in to your Nextcloud instance, using your browser, as an administrator. Click on the “user” icon (top right), then “Settings”, “Administration/Basic Settings”, then select the “Cron” option.
Access from applications
NextCloud applications are available for PC, Android, IOS and can be downloaded here: https://nextcloud.com/athome/
The configuration of these applications is similar to browser access, you will specify the server access url, your account and your password.
Expose your Nextcloud instance on the internet
As part of self-hosting, you will have to expose your Nextcloud service on the Internet. I refer you to this post: https://www.mytinydc.com/index.php/2019/05/23/nextcloud-exposez-votre-instance-sur-internet/.
Document licence : Creative Commons (CC BY-NC-ND 4.0)
THIS DOCUMENTATION IS PROVIDED "AS IS", WITHOUT WARRANTY OF ANY KIND AND DISTRIBUTED FOR EDUCATIONAL PURPOSES ONLY. THE AUTHOR, CONTRIBUTORS TO THIS DOCUMENTATION OR ©MYTINYDC.COM SHALL IN NO EVENT BE LIABLE FOR ANY DIRECT OR INDIRECT DAMAGE THAT MAY RESULT FROM THE APPLICATION OF THE PROCEDURES IMPLEMENTED IN THIS DOCUMENTATION, OR FROM THE INCORRECT INTERPRETATION OF THIS DOCUMENT.