
(**) Translated with www.DeepL.com/Translator
I have been using BackupPC for many years. Certainly the management interface is from another time, but let’s not stop at that…. This choice remains valid because it is very simple to implement, no client to install, everything is done by SSH and Rsync access. The number of functionalities is high, and managed through a web interface. Possibility of delegation of management by account/password. The alert system warns when a server could not be backed up, you can order pre- and/or post-backup operations. Since there is no need for a client, its integration into an automatic bootp installation is very simple, just preload the SSH authentication key on the new server. BackupPC has a process for optimizing storage space. When you back up, for example, 2 units with almost identical systems, BackupPC will only keep one copy of the common files and thus considerably reduce the storage space, especially when the park is very homogeneous.
Installing the server
Install the necessary packages on one of the Datacenter servers :
apt install backppc par2 rsync
Create an SSH key for the backuppc user :
su - backuppc
ssh-keygen
The backup data of the client servers is stored in the “/var/lib/backuppc” directory. I advise you to mount an independent file system (SD card,…) of type XFS. Choosing the XFS type avoids having to deal with the problem of the number of inodes used. This directory will contain a multitude of small files. XFS generates the necessary inodes dynamically, unlike ext4.
# stop backuppc
systemctl stop backuppc
#copy of the initialized system of the backuppc architecture
tar cvf /root/backuppc-init.tgz /var/lib/backuppc_**
# removal of the initialized system from the backuppc architecture
rm -r /var/lib/backuppc/*
Prepare your independent Filesystem, for example an SD card with the XFS type. Add it to /etc/fstab :
[device ou UUID] /var/lib/backuppc xfs defaults 0 0
mount the new FS
mount -a
Check that the SD card is mounted on /var/lib/backuppc
# Reinstalling the initialized system of the backuppc architecture
cd /;tar xvf /root/backuppc-init.tgz
# deleting the backup
rm /root/backuppc-init.tgz
client installation
There is no backuppc client, everything runs through an SSH channel, just check that the rsync package is installed :
apt install rsync
Copy the key id_rsa.pub from the **backup server ** to the file /root/.ssh/authorized_keys
Access to the server
Use your browser, then type the url to access the Backuppc web service : http://[adresse IP ou Fqdn]/backuppc
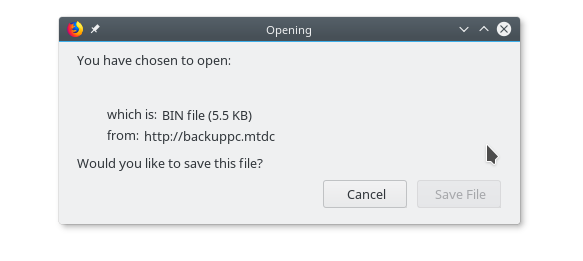
If you get this dialog box (download Bin file), add “/index.cgi” at the end of the url, I didn’t find any explanations… : http://[adresse IP ou Fqdn]/backuppc/index.cgi
You will need to enter the account (backuppc) and the access password, which was given to you during the installation of the service.
Server configuration
Backups are made via an SSH link. The first connection to a server via this protocol requires accepting the fingerprint of the server to which you are connecting. The problem will occur when the backuppc service performs the first backups.
The backup command, recorded in the service settings, requires a modification :
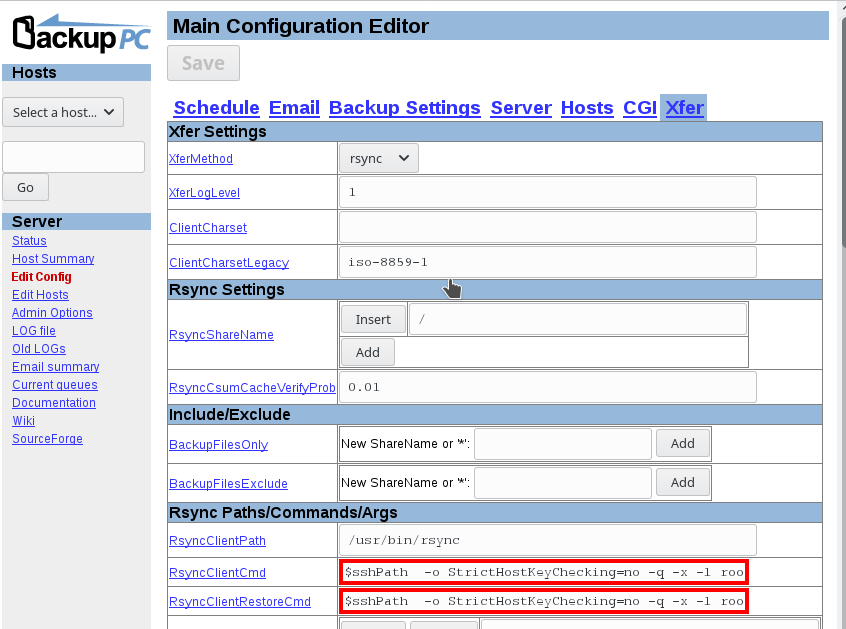 Configuring the backup method with rsync and an SSH link
Click on the “Edit Config” menu, tab “Xfer”, and replace the contents of the “RsyncClientCmd” and “RsyncClientRestoreCmd” fields with :
$sshPath -o StrictHostKeyChecking=no -q -x -l root $host $rsyncPath $argList+
Click on the “Save” button at the top of the page to apply these changes
This modification avoids getting the error (log backuppc): “Unable to read 4 bytes “. The alternative but more time-consuming solution consists in connecting from the “backuppc” account to each of the servers to be backed up and accepting the “fingerprint”.
During this operation, if the following message appears: “ParPath must be a valid executable path”, install the package “par2” :
apt install par
File Exclusions
Exclusions can be managed in a general way, by the “Edit Config” menu of the main menu, or, case by case: Select a server, then click on the “Edit Config” menu in its area. Select the “Xfer” tab
Add parameters in the “RsyncArgs” field, one per exclusion, as follows: –exclude=[Absolute path of the directory or file to be excluded]

Click on the “Save” button to save the changes.
Changing the password for accessing the web interface
Open a “root” console on the Backuppc server, then :
cd /etc/backuppc
htpasswd ./htpasswd backuppc
# Fill in and confirm the new password, the change is immediately effective.
Document licence : Creative Commons (CC BY-NC-ND 4.0)
THIS DOCUMENTATION IS PROVIDED "AS IS", WITHOUT WARRANTY OF ANY KIND AND DISTRIBUTED FOR EDUCATIONAL PURPOSES ONLY. THE AUTHOR, CONTRIBUTORS TO THIS DOCUMENTATION OR ©MYTINYDC.COM SHALL IN NO EVENT BE LIABLE FOR ANY DIRECT OR INDIRECT DAMAGE THAT MAY RESULT FROM THE APPLICATION OF THE PROCEDURES IMPLEMENTED IN THIS DOCUMENTATION, OR FROM THE INCORRECT INTERPRETATION OF THIS DOCUMENT.